Lemon Cupcakes with a Lemon Buttercream Frosting

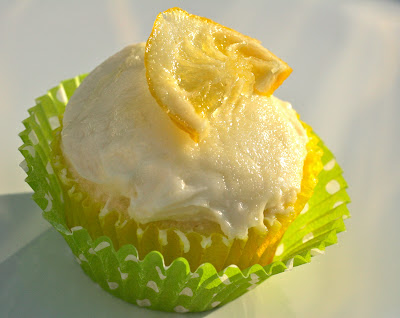
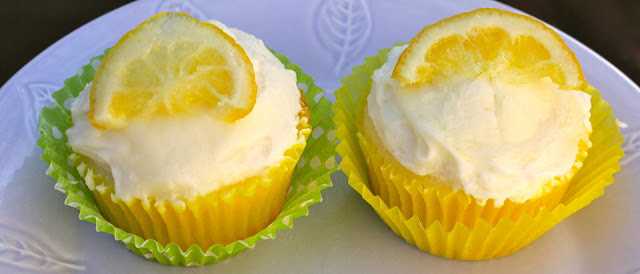
Who loves lemon? I love lemon, and I also love this recipe for lemon cupcakes. The cake of the cupcake uses cake flour, which is an absolute must in this recipe – so no substitutions. Cake flour makes these cupcakes light and airy. You can find cake flour in the baking section at most all grocery stores. I use the Softasilk brand of cake flour. The flour is fine, silky, smooth, and perfect for this tender cupcake. Not only is the cake good, but the frosting on these cupcakes is also pretty incredible. remember a friend who tried these cupcakes had described the frosting as “ridiculous in a ridiculously good way!” 

I think you will really enjoy these cupcakes. The cake is amazing, the lemon buttercream frosting is ridiculously good, and the candied lemons add a nice touch. The candied lemons are edible – they taste like lemon candy! Yum. 

Recipe for Lemon Cupcakes with a Lemon Buttercream Frosting

INGREDIENTS

  • 3 sticks of unsalted butter (softened at room temperature)
  • 2 cups of granulated sugar
  • 3 cups of cake flour (no substitutions)
  • 1 tsp. of baking powder
  • 1/2 tsp. of salt
  • 1/2 tsp. of baking soda
  • 5 large eggs
  • 2 tsp. of vanilla extract
  • Zest of 2 lemons (save lemons to juice them)
  • 4 Tbsp. of freshly squeezed lemon juice
  •  1 cup of buttermilk

DIRECTIONS

Preheat the oven to 325 degrees. Line two 12-cup muffin/cupcake tins with paper cupcake liners.
Add the softened butter and sugar to a large bowl. Beat the butter and the sugar together with an electric hand mixer on medium speed until the mixture is light and very fluffy (about 5 minutes or so).
In a medium bowl, add the dry ingredients (flour, baking powder, salt, and baking soda). Sift the ingredients together and set aside.
Add the eggs, one at a time, to the butter and sugar mixture. Make sure to beat egg into the mixture on low speed after each addition. Stir in the vanilla extract, lemon juice, and lemon zest. 
Now beat in the dry ingredients and the buttermilk in alternating additions to the butter, sugar, and egg mixture. First add about a third of the dry ingredients to the mixture and mix on low speed until just incorporated. Then add about half of the buttermilk to the mixture and mix on low speed. Continue alternating the dry ingredients and buttermilk into the mixture, ending with the dry ingredients. Make sure that all of the ingredients are well incorporated and that the mixture is fluffy.
Using a cookie dough scoop or small ladle, scoop the batter into each cupcake liner. Fill the liners with the batter almost to the tops, because the batter does not rise much.
Bake cupcakes for 20 – 25 minutes. Remove from oven and cool completely. Once cooled, frost with the lemon buttercream frosting and garnish with the candied lemon slices, if desired. 
(Makes about 2 dozen cupcakes)

For the Lemon Buttercream Frosting

INGREDIENTS

  • 2 1/2 sticks of unsalted butter (softened at room temperature)
  • 2 – 3 Tbsp. of freshly squeezed lemon juice
  • 1 tsp. of lemon zest
  • 3 cups of powdered sugar

DIRECTIONS

Put the butter, lemon juice, and lemon zest in a medium mixing bowl. Using a hand mixer set on medium-low speed, beat together until the butter is smooth and creamy. Gradually add in the powdered sugar, about 1/2 cup at a time, and mix on low until the frosting is at a good consistency for spreading. 
Lemon Cupcakes with Lemon Buttercream Frosting Recipe from: Our Best Bites

For the Candied Lemons

INGREDIENTS

  • 1 cup of water
  • 1 cup of granulated sugar
  • 2 lemons 

DIRECTIONS

Wash and dry the lemons. Slice the lemons very thinly, and cut into halves or quarters. Add the water and sugar to a small saucepan. Put the saucepan over medium-high heat until the sugar dissolves. Add the lemon slices to the pan in a single layer and reduce the heat to low. Simmer for 10 minutes, then use a fork to gently flip the lemons over. Simmer for another 10 minutes. Pour the lemons and syrup into an airtight container and store until ready to use.

Advertisement

Easy Chocolate Truffles Made with Cocoa Powder

As many of my friends know, I love truffles. When I am craving truffles and want to make them quickly, I go for this recipe because it requires very little hands-on time. These truffles do not require the step of dipping in chocolate, because they are rolled and dusted in cocoa powder. You can also coat them in powdered sugar, nuts, coconut, or anything else that sounds good to you! Some of my favorites to coat in are cacao nibs and toasted coconut. I hope you will love these easy chocolate truffles. Enjoy!

Recipe for Easy Chocolate Truffles (made with cocoa powder)

INGREDIENTS

  • 1 1/2 sticks of unsalted butter
  • 3/4 cup of cocoa powder
  • 1 can of sweetened condensed milk
  • 1 Tbsp. of vanilla
  • Cocoa powder or powdered sugar for rolling
  • Add-ons for rolling (toasted coconut, cacao nibs, nuts) – optional

DIRECTIONS

Put the butter in a small saucepan set over low heat. Allow the butter to melt completely. Once the butter has melted, stir in the cocoa powder. Stir until the mixture is completely smooth. Increase the heat to medium and immediately add in the sweetened condensed milk. Stir the mixture constantly for about 3 minutes. Remove the saucepan from the heat and then add in the vanilla. Carefully pour the mixture into a heat safe container and cover it tightly. Place in the fridge for a few hours or more.

When ready to shape the truffles, take out a baking sheet and cover it with parchment paper. Make sure to have your cocoa powder, powdered sugar, or add-on ingredients ready. (I placed about 1/2 cup of cocoa powder and 2 Tbsp. of cacao nibs in a bowl for the cacao nib truffles, and I placed the  toasted coconut in the baking pan for the coconut truffles.)

Use a cookie dough scoop to scoop up some of the truffle mixture. Slightly shape, and then generously dust and roll the truffle in the powder mixture or add-on mixture. Roll with your hands into desired shape. Place the shaped truffle on the parchment paper, and repeat dusting, rolling, and shaping truffles with the remaining mixture until it is gone.

Put the truffles in the fridge to allow them to harden a bit. Once hardened, place the truffles in an airtight container. Store the truffles in the fridge until ready to eat. Makes about 2 dozen delicious truffles. 
Recipe Source: Hershey’s

To toast the coconut, preheat oven to 325 degrees. Place desired amount of sweetened flaked coconut in a baking pan and spread it evenly over the pan. Place the pan in oven & cook for  about 15 minutes, or until coconut is lightly browned. 

Coconut Truffles

Cookie dough truffles get the first prize as being the fan favorite, but for coconut lovers, these coconut truffles are the winner. I’ve been told by these coconut lovers that the coconut truffles are way better than Mounds or Almond Joy bars, and even quite a few non-coconut lovers even go back for seconds. These are so delicious! Just do the coconut if you want it to more more mounds-like. To create an Almond Joy effect, add in the toasted almond. You really can’t go wrong either way. Enjoy!

Recipe for Coconut Truffles

INGREDIENTS

1 14-ounce bag of sweetened shredded flaked coconut
1 can of sweetened condensed milk
3 – 4 Tbsp. of all-purpose flour
2 tsp. of vanilla extract
1 1/4 tsp. of almond extract
16-ounces of semisweet baking chocolate squares, broken in half
Toasted almond, whole or cut in half (optional)

DIRECTIONS

Place the coconut, condensed milk, almond extract, vanilla extract, and flour in a large mixing bowl. Mix together until well incorporated. Cover the bowl and put into the fridge for 2 hours or more. Line a few containers with parchment paper. Once the mixture is chilled, use a cookie dough scoop to roll 1 to 1 1/2-inch balls and place each one into the prepared containers. If using the almonds, press one almond in the middle of a coconut ball so it sticks (the ball may flatten, but that is ok). Cover the containers with foil and place in the freezer for 2 hours or longer.
Place chocolate squares into a small saucepan. Place a double boiler filled one-quarter full with water over the stovetop set on medium-high heat. When the water simmers and you see steam, put the saucepan with the chocolate on top of the double boiler. Let the chocolate melt completely, frequently stirring until it is melted. Take one container of the coconut balls out of the freezer. Remove the melted chocolate from heat. Use a spoon to drop one or two coconut balls into the melted chocoalte. Coat entirely with the chocolate, and then place one a baking pan lined with a silicone baking mat or parchment paper. Continue dipping until each coconut ball is coated, and then repeat the process with the rest of the frozen coconut balls (taking one container out of the freezer at a time). Once all are coated, place the baking sheet in the fridge to cool and allow the chocolate to harden. They will be ready to devour within 30 minutes or less. ENJOY!

***Original Recipe***

Cookie Dough Truffles

Years ago, I would have never thought I would be able to make homemade truffles. Now I have kind of been addicted to making truffles for quite awhile! I first learned how to make cookie dough truffles. Since then, I’ve made several different types of truffles. These cookie dough truffles are a fan favorite out of all the truffles I have made. I have not met anyone who does not like them, unless they just don’t like chocolate (and that’s just weird). Now, you can learn how to make truffles too!

The cookie dough truffles are amazingly good and totally addicting. The best part is that they taste exactly like cookie dough covered in chocolate (wow), but there is no raw egg in the mixture, so no worries about salmonella. The cookie dough mixture all sticks together using sweetened condensed milk, which also plays a big role in making them so delicious.

I think it is only fair to add this warning to this truffles posting, so here it is: Once you learn how to make truffles and they are shared with your friends, they will always ask you to make them. Any time you are invited to a potluck, baby shower, wedding shower, or other food-centered event – you will be going with truffles in hand! Enjoy.

Recipe for Cookie Dough Truffles

INGREDIENTS

1 stick of unsalted butter, softened at room temperature
3/4 cup of light brown sugar
1 can of sweetened condensed milk
2 1/4 cups of all-purpose flour
1 tsp. of vanilla extract
3/4 cup of semisweet OR milk chocolate chips (mini or regular size)
16 ounces of semisweet baking chocolate squares OR 15 ounces of milk chocolate baking squares

DIRECTIONS

Place the butter and brown sugar into a large mixing bowl. Use a hand mixer set on medium-low speed to cream the butter and sugar together until smooth. Add in the condensed milk, flour, and vanilla extract to the mixture and mix to incorporate well. Fold in the chocolate chips. Cover the bowl and place in the fridge for a few hours.
Once chilled, use a cookie dough scoop to roll the cookie dough batter into 1 1/2-inch balls. Place each ball in a container lined with aluminum foil (you might need more than one container). Cover each container used with foil, and place in the freezer for 2 hours.
When ready to dip the balls, place the chocolate squares into a small saucepan. Place a double boiler filled one-quarter full with water over medium-high heat. Once it begins to steam, place the pan of chocolate on top. Stir the chocolate until it is fully melted. Take one container of frozen cookie dough balls out of the freezer. Remove chocolate from heat. Using a spoon, drop in one or two of the cookie dough balls at a time into the melted chocolate. Fully coat with the chocolate, then drop onto a baking pan lined with a silicone mat or parchment paper. Repeat steps with the rest of the frozen cookie dough balls. Once all are coated and on the baking pan, place the pan into the fridge to allow the chocolate to harden more. They should be ready to indulge in within 30 minutes or less. Try to eat just one – I dare you!

Recipe Source: Annie’s Eats

Coconut Macaroons – No Egg!

I really like to make macaroons because they are easy to make and because Greg loves them so much. I can remember eating my mother’s macaroons as a child. When I got married I asked her about the recipe, and she told me  to search the web for recipes that use condensed milk rather than egg whites. And so the searching and baking began…

It took me quite a while to perfect the macaroon recipe. Although the macaroons have always tasted delicious, they would spread way too much and get really gooey.  To prevent the spreading, I learned to add flour to the batter. It is also an absolute MUST to bake the macaroons on a baking sheet lined with parchment paper or a silicone baking mat, otherwise they will stick to the pan and be destroyed – and that would be very sad.

After making macaroons and handing three of them to Greg with a glass of milk, I asked him to describe the macaroons for me. All he could come up with was: “they are good and coconutty.” No wonder he has never written me any love poems…

To get a better description, I asked a friend. She described them like this: “It is funny because I am not sure I have ever considered myself a coconut lover but the macaroons are so amazingly good and addicting – I can never have one or even two for that matter. They are sweet, but they also have a toasted nutty flavor that is irresistible. They are chewy but they melt in your mouth at the same time. Ohhh, so yummy!”

These macaroons really are pretty incredible. Even if you’re not a coconut lover, you will fall in love with them – I promise!

Recipe for Coconut Macaroons

INGREDIENTS

1 14-oz bag of sweetened shredded flaked coconut
1 can of sweetened condensed milk
1 1/2 tsp. almond extract
2 tsp. vanilla extract
2 – 3 Tbsp. of all-purpose flour

DIRECTIONS

In a large mixing bowl, mix together the coconut, condensed milk, flour, almond extract, and vanilla extract until well incorporated. Cover and put bowl in the fridge for several hours; overnight if needed.

Use a cookie dough scoop to scoop batter and then roll with your hands to form 1 1/2-inch balls. Place each ball on baking pans lined with a silicone baking mat or parchment paper, leaving about 1-inch of space in between each.
Preheat oven to 330 degrees. Bake for 20 – 23 minutes, or until the tops are golden brown.
Immediately transfer macaroons to a plate. Enjoy!

*Makes about 2 1/2 dozen cookies.-Recipe adapted from various sources & then adjusted to my preference-

%d bloggers like this: