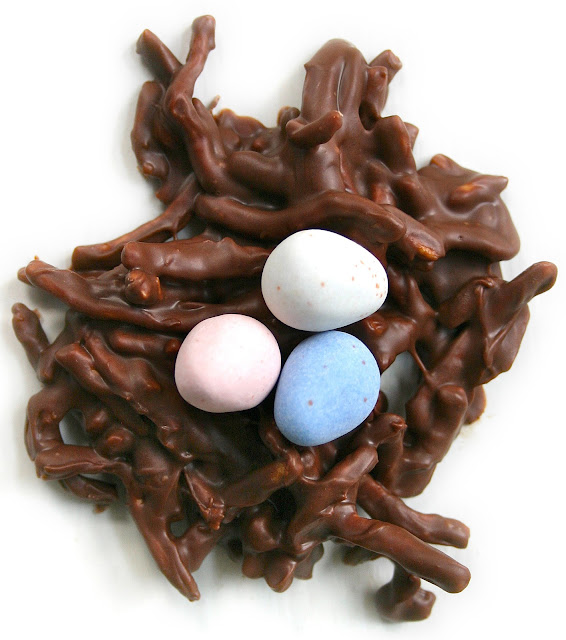
So, how cute are these chocolate bird nests? They are pretty adorable! Full disclosure, before making these, I did not think I would have enough artistic talent to make them look good, but I was very happy with the results! It has been awhile since i have made them. This Easter, I may try them with butterscotch chips in place of the peanut butter chips or just extra chocolate chips. They are easy to assemble and so fun to eat. This treat is perfect for Easter or just for celebrating spring! Enjoy.
Recipe for Chocolate Bird Nests with Cadbury Eggs for Easter
INGREDIENTS: One 12-ounce bag of semisweet chocolate chips One 12-ounce bag of peanut butter chips One 12-ounce bag of chow mein noodles 36 – 48 Cadbury mini eggs (amount depends on how many nests you are able to make)
DIRECTIONS: Line a couple to a few baking sheets with parchment paper or silicone baking mats. Add the chocolate and peanut butter chips to a large microwave safe bowl. Place bowl in the microwave and heat for one minute on medium power, then take out bowl and stir. Continue this process of heating and stirring until the mixture is completely melted and smooth. Stir the chow mein noodles into the melted chocolate/peanut butter and stir until the chow mein noodles are completely coated. Use a large spoon to drop about 1 1/2 tablespoons of the mixture onto the parchment paper. Use the spoon to flatten and shape into nests. Place 3 eggs on top. Continue until you have used all of the chocolate/peanut butter/chow mein mixture. Place in the fridge to harden, or in the freezer to speed up the process. Recipe makes 12 – 15 bird nest candies.
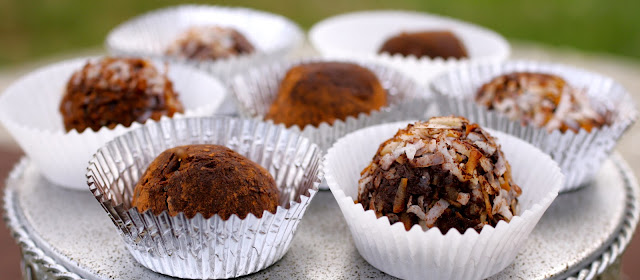
Have you ever heard of a “happy accident?” Years ago I worked with a woman who had so many of her own sayings, to the point where I labeled them *Meganisms, after her name. I would constantly laugh at the things she would say, but now I find myself repeating everything she did say in my old(er) age. One of her ‘isms was “happy accidents.” If a mistake was made and we turned it into something good, she would always say “now that is what you call a happy accident!” Once upon a time I was baking brownies and pies, and I was a bit distracted while cooking. I have never been the best multitasker, and I ended up making a pretty big mistake with the brownies. When I took them out of the oven, I could tell something seemed different about the texture, but I couldn’t quite put my finger on it. Then it hit me. I was halving a recipe and instead of putting a half pound (2 sticks) of butter in the brownie batter, I had only put in a quarter pound (1 stick). I had it in my head that one stick has 8 tablespoons of butter and translated that into 8 ounces, which is a half pound! So, what did I do? At first I thought that the brownies tasted fine, just a little dry, and I was right. But I decided I didn’t want dry brownies. So I turned those brownies into brownie truffles! And that, my friends, was a happy accident that occurred in my kitchen. The brownie truffles are even better than the brownies, which are pretty darn good. They are very rich, and you might just need one. My niece, however, exclaimed that she could only eat three (in a matter of five minutes or less) because they were so rich. Here is the recipe for these out of this world brownie truffles. Enjoy!
*Note: Name has been changed to protect the anonymity of the individual but the story is true.
Recipe for Brownie Truffles
INGREDIENTS
For the brownies: One 12 ounce bag of Ghiradelli semisweet chocolate chips One 10 ounce bag of Ghiradelli bittersweet chocolate chips (you will have a little leftover) 3 eggs 1 stick (8 Tbsp.) of unsalted butter 1 Tbsp. of instant coffee granules 1 Tbsp. of pure vanilla extract (I like Nielsen Massey) 1 cup granulated sugar 1/2 cup plus 2 Tbsp. of all-purpose flour 1 1/2 tsp. of baking powder 1/2 tsp. of salt For the truffle filling: Cooked brownies 1 stick of unsalted butter, at room temperature For the truffle coating: One 9.7 ounce bar of bittersweet baking chocolate (70% cacao) , coarsely chopped
DIRECTIONS
For the brownies: Preheat the oven to 350 degrees. Butter and flour a 13 x 9 baking pan (mine is 2.75″ deep). Melt the butter, half the bag (6 ounces) of the semisweet chocolate chips and a little over half the bag of bittersweet chocolate chips (about 6 ounces) in a medium saucepan over simmering water. Stir constantly until fully melted and smooth, then remove the saucepan from the heat and allow it to cool slightly. In a large mixing bowl, gently stir the eggs, coffee granules, pure vanilla extract, and sugar. Then stir the chocolate mixture in and allow it to cool to room temperature. In a medium bowl, sift together 1/2 cup of the flour, baking powder, and salt. Stir in to the chocolate mixture. In a smallish bowl, toss the remaining flour and the rest of the bag of semisweet chocolate chips and about 2 ounces of the bittersweet chocolate chips together. Coat the chocolate chips as well as you can with the flour. Then fold into the chocolate batter. Spread the brownie batter evenly into the prepared baking pan. Bake for 20 minutes, and then after 20 minutes, rap the pan against the oven shelfto get air to escape between pan and dough. Then bake for an additional 8 – 12 minutes, or until a toothpick comes out clean when inserted. Transfer the brownie pan to a cooling rack and allow to cool. Once brownies are cooled to room temperature (or slightly warmer), scrape all the brownie into a large bowl. Add in the softened butter. Use your hands to work together. Then use an electric hand mixer set on medium low speed and beat until smooth. It should kind of resemble a batter again. Cover the bowl and place in the fridge for a couple hours. Line a couple freezer safe containers with foil. Use a cookie dough scoop and your hands to form the mixture into 3/4-inch balls. Place each ball into the foil lined containers. Cover containers and place in freezer for several hours, or overnight. Prepare a double boiler with water. Bring water to a simmer, and then place the bittersweet chocolate in top boiler and melt over the simmering water. Once chocolate is melted, turn off stove heat. Drop one ball at a time into the melted chocolate and use a spoon to coat. Place each coated ball onto a foil lined baking sheet. Place baking sheet in fridge and allow coating to harden before serving. If not serving right away, store in the fridge in airtight containers. Brownie truffles can be served from fridge or at room temperature.
Brownie recipe adapted from: Ina Garten’s Outrageous Brownies Recipe Brownie truffles – original recipe.
Recipe makes approximately 4 dozen brownie truffles
I am a lover of ginger. I think that ginger is one of those things that people either love or hate. So, if you’re not a ginger lover than perhaps this truffle is not for you. But, if you enjoy its warm and subtly spicy flavor then I do believe you will absolutely love this truffle. I was first introduced to the combination of ginger and chocolate at a chocolate shop in San Francisco several years back. My husband and I visited my sister who was living in Noe Valley at the time and we happened to walk into the store. It was the first time that I realized that chocolate could be combined with spices and it opened up a whole new world for me. I ordered a bunch of the chocolate and then later chocolate by Vosges started popping up and I was able to buy exotic chocolates at the grocery stores! And, I have tried the bacon and chocolate bar and I’ve got to be honest, I’m not a fan. Are you?
The filling of this dark chocolate ginger truffle is made of a dark chocolate ganache with freshly grated ginger and then it is coated with an even darker chocolate and topped with a piece of crystallized (candied) ginger. They are so good that someone who sampled them came to me weeks later and asked me to make them for her so she could give them to someone as a gift. That is the thing with truffles. They are very special and if you take the time to make them, they make perfect gifts. Or, perfect treats just for you and nobody else! Enjoy.
Recipe for Dark ChocolateGinger Truffles
INGREDIENTS
For the ganache filling 4 1/2 ounces of heavy whipping cream 3/4 – 1 tsp. of grated fresh ginger (use a microplane to grate) 5 1/2 ounces of semisweet chocolate, very finely chopped For rolling, dipping and topping Dutch-processed cocoa powder (for rolling) 8 ounces of bittersweet chocolate, finely chopped (for coating) Several pieces of crystallized ginger, cut into thin and small pieces (for topping) decorative sugar, if desired (for topping)
DIRECTIONS
Heat the cream and ginger in a medium saucepan over medium heat. When it comes to a simmer, immediately pour the very finely chopped semisweet chocolate it and remove from heat. Cover the pan with a lid and allow it to sit for five minutes. After five minutes, use a spoon to stir gently until the mixture is smooth and all the cream is mixed in to the chocolate. Pour the chocolate into a shallow container, cover tightly, and set in the fridge for at least 4 hours. Take the mixture out of the fridge and open container. Dust hands with cocoa powder and have a bowl of cocoa powder and paper towels very close by. You may want to roll up your sleeves, too! Use a cookie dough scoop to scoop some of the mixture and gently shape into a ball. Drop onto a foil lined container. Continue to scoop and shape and drop until the mixture is gone. Then cover the container tightly and put in the freezer for at least 4 hours, preferably overnight. Prepare a double boiler with about one inch of water. Once the water begins to steam, put the pan with the bittersweet chocolate on top and stir until it is thin and smooth. Take the ganache filling balls out of the freezer. Line a baking tray with foil. Drop a ball into the chocolate, use a spoon to coat, and then drop on the foil lined tray. Top with a piece of crystallized ginger and sprinkle on some decorative sugar, if desired. Put the tray in the fridge until they harden, then store in an airtight container in the fridge. Store in the fridge but when they are served, serve at room temperature.
Recipe makes approximately 2 dozen truffles. Recipe Adapted from: Truffles, by Dede Wilson
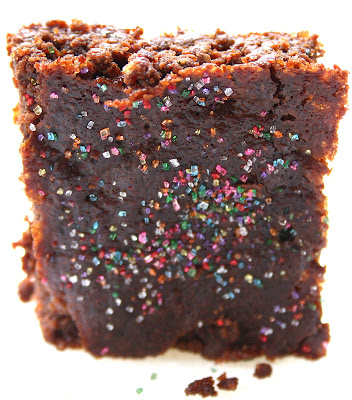
I discovered these zucchini brownies years ago when I was experimenting with different recipes with zucchini. I had come across the recipe on Pinterest, and since at that time I had tons of zucchini growing in my garden, I gave them a try. They were so much better than I had expected! They were actually pretty incredible. I think these brownies are just as good as any other brownie I have ever had, and if you are gluten-free or health conscious, these are a dream come true! The true test of the amazingness of the zucchini brownies was when my nieces came for a visit. Now, they have been known to be pretty picky about what they eat (they were on a mac and cheese & bread diet back in the day). I decided to give them the brownies but did not tell them that they were healthy or filled with veggies. When they were devouring them, I asked if they liked them, and they said yes – and then asked if they could have more! After they ate their seconds, we spilled the beans to let them know that they ate brownies with zucchini! These brownies are sure to be a new favorite sweet treat to make when you are looking for something a little healthier. Because they have some chocolate in the batter, the brownies are not vegan. And, when it says no sugar, that means there is not any granulated sugar in the recipe, but obviously there is sugar in the natural ingredients in the recipe. But they are gluten-free, healthy, and delicious! Make sure to put them into the fridge to harden before cutting and serving. Enjoy!
Recipe for Zucchini Brownies (No Butter, Flour, Sugar, Oil or Egg)
INGREDIENTS
1 1/2 cups grated zucchini
1 cup of store bought almond butter, at room temperature 1/2 cup of honey 1 Tbsp. of pure maple syrup 1/8 tsp. of pure vanilla extract 3/8 tsp. of baking powder 1/2 tsp. of baking soda 1 Tbsp. of cocoa powder (I used natural cocoa powder) 1/16 tsp. of salt 4.5 ounces of bittersweet chocolate (70%) chopped coarsely 1/2 cup of mini semisweet chocolate chips Coarse sea salt, for sprinkling (optional)
DIRECTIONS
Preheat the oven to 350 degrees. Generously grease the bottom and sides of an 8 x 8 pan with butter or coconut oil (this will be the only butter or oil used in the entire recipe).
Combine the grated zucchini, almond butter, honey, and maple syrup in a large bowl. Use a mixing spoon and stir until ingredients are well incorporated. Add in the vanilla extract.
In a smallish bowl, combine the baking powder, baking soda, salt, and cocoa powder. Sift the ingredients together and then set aside.
Heat the bittersweet chocolate. Prepare a double boiler and heat the chocolate in a pan over simmering water. Stir constantly until the chocolate is melted and smooth. Set the melted chocolate aside and allow it to cool slightly (a few minutes). Spoon the melted chocolate into the zucchini mixture, and mix to incorporate well. Add in the cocoa powder mixture and stir well. Fold in the mini chocolate chips. Pour the batter into the prepared baking pan. Sprinkle desired amount of coarse sea salt over the batter (a little goes a long way – I used just a couple pinches). Put into the oven and bake for 35 – 40 minutes, rotating the pan halfway during baking.
Remove from oven. Allow them to cool completely at room temperature. Cover with foil and put into the fridge to harden for a couple hours before cutting and serving. *Makes about 16 brownies* Recipe Adapted from: Delighted Momma, originally from Fast Paleo
Zucchini brownies – healthy(er) & delicious! I added decorative sugar to celebrate how awesome they are.
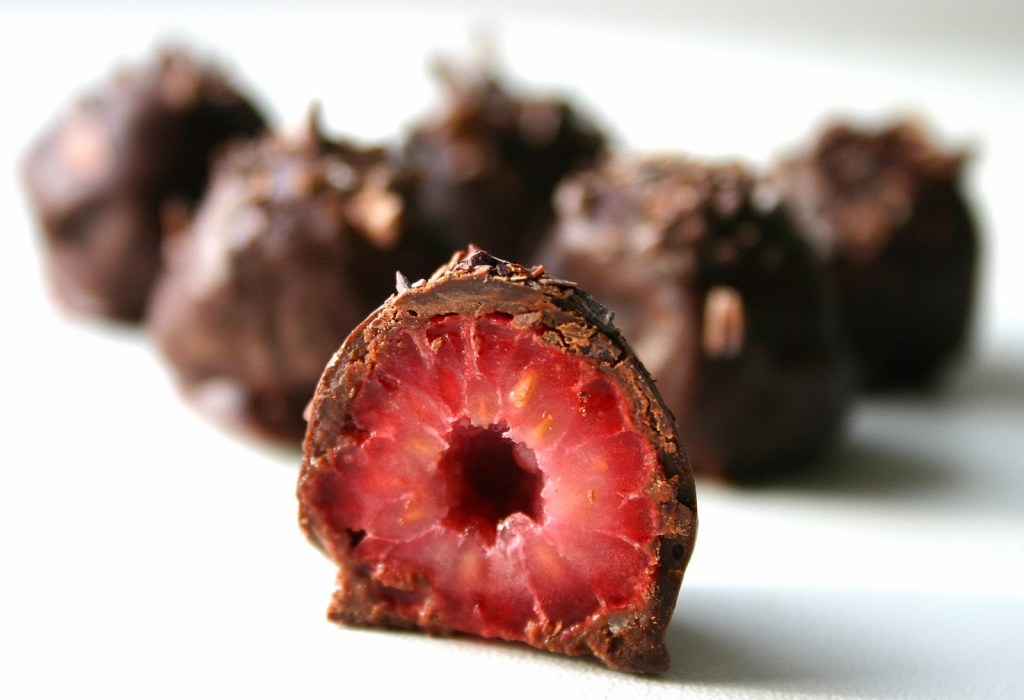
Looking for treat ideas for Valentine’s Day? These dark chocolate raspberry truffles are rich, elegant, and truly fantastic. These truffles are not made of a sweet filling, as the filling is the raspberry itself! The raspberry is gently rolled in a small amount of sugar, then covered with a chocolate ganache, and topped off with a coating of dark chocolate. Amazing! If you make these, make sure to eat within a couple days because the raspberries are perishable. I don’t think you’ll have any problem with that, though. Enjoy!
*As far as truffles go, these are very low in calories because the filling is just the raspberry. Each truffle is only about 35 calories! So eat up – dark chocolate and raspberries are GOOD FOR YOU. You will also probably have some leftover ganache. Just put it in a container and store in the fridge – it will make a nice addition to hot chocolate.
Recipe for Dark Chocolate Raspberry Truffles
INGREDIENTS
For the filling 40 – 45 fresh and firm raspberries 3 – 4 Tbsp. of granulated sugar For the ganache 4 1/2 ounces of heavy whipping cream 6 ounces of bittersweet baking chocolate (70% cocoa), very finely chopped For the coating and topping 4 1/2 ounces of bittersweet baking chocolate, finely chopped Cacao nibs
DIRECTIONS
Gently rinse the raspberries and set on a plate lined with a paper towel to drain the moisture. Pat dry if needed. Put the sugar into a shallow bowl. Roll each berry in the sugar and place onto another plate.
Line a baking sheet with foil. Put the cream into a small saucepan and set over medium heat until it just comes to a simmer. Then remove the cream from heat and immediately pour in the very finely chopped bittersweet chocolate. Cover the saucepan and let it sit for 5 minutes. After 5 minutes, use a spoon to very gently stir the mixture until it is completely smooth. Use a spoon to dip a berry into the ganache and coat completely. Use the spoon to place the ganache covered berry onto the prepared baking sheet. Once all berries are coated, place baking sheet in fridge for a few hours or overnight. If after a few hours they do not seem hard enough, place in the freezer for about 30 minutes.
Prepare another baking sheet with foil. Prepare a double boiler with water and put the finely chopped bittersweet chocolate into the top pan of a double boiler. Put the bottom pan with the water onto the stovetop over medium-high heat and when it comes to a simmer and steam is rising, place the pan with the chocolate on top. Stir the chocolate constantly until it is completely melted. Turn off stovetop heat. Carefully drop a ganache covered raspberry into the melted chocolate and use a spoon to coat completely. Use the spoon to place it onto the other foil lined baking sheet. Sprinkle on some cacao nibs. Continue this process until all are coated. Put the dark chocolate raspberry truffles in the fridge and allow the chocolate coating to harden.
Store truffles in an airtight container in the fridge, but serve truffles at room temperature. Consume within a couple days of making.
These macaroons are a new and improved version of the coconut macaroons I love to make. This recipe adds in almonds and dark chocolate to the mix – yum! Many friends have mentioned to me how much they like the macaroons and the coconut truffles so I thought combining the two recipes would be a great idea. And it was. Enjoy!
Recipe for Best Coconut Macaroons Ever with Chocolate & Almonds
INGREDIENTS
1 14-oz bag of sweetened shredded flaked coconut 1 14-oz can of sweetened condensed milk
2 Tbsp. of all-purpose flour 2 tsp. of vanilla extract 1 1/2 tsp. of almond extract 1 cup of finely chopped almonds 8 oz of semisweet baking chocolate squares, broken in half
DIRECTIONS
Combine the coconut, condensed milk, flour, vanilla extract, almond extract, and finely chopped almonds in a large mixing bowl. Mix until it is well blended. Cover the bowl and put it into the fridge for at least 3 hours.
Preheat the oven to 330 degrees. Line baking sheets with parchment paper.
Use a cookie dough scoop to scoop up the mixture. Use your hands to form into 1 1/2 inch balls and place on the baking sheet, leaving an inch of space between each. Place in oven and cook for 20 – 23 minutes, or until tops are golden. Remove pan from oven and allow to cool completely.
Once macaroons have completely cooled, place the chocolate into a small saucepan and set it over low heat. Stir constantly until the chocolate melts. Turn off the heat. Use a fork to drip chocolate over the cooled macaroons (using as much or as little chocolate as you like). Place macaroons in the fridge until the chocolate hardens, then remove from fridge and store in an airtight container.
*Recipe makes about 30 coconut macaroons*
The cookie dough scoop makes shaping so much easier!
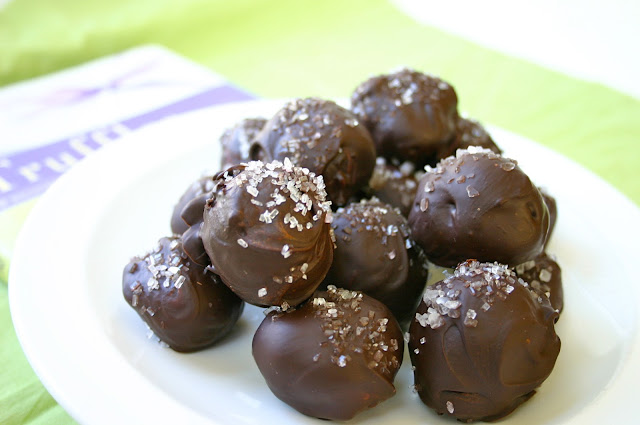
If you know me, you know that I love truffles. Not only do I love to eat truffles, I also really enjoy making them. This truffle recipe is a lot of fun and it combines a lot of things that many people crave – chocolate, red wine, and salt. The first time I made these, I used coarse decorative sugar on the top. When I shared that batch with some of my old coworkers they first thought it was sea salt and when they found out it wasn’t, they asked me if they could pretend it was sea salt. But why pretend when you can have the real deal? Adding sea salt to them was a great idea. Now when I made these truffles I make some with sea salt, some with sugar, and some with both the sea salt and the sugar. Each one is delicious. The flavor of the red wine is very subtle, and the chocolate is perfectly rich and creamy. The crunch from the salt and/or sugar is a fun touch. So, if you are craving sweet, salty, sinful, rich, and indulgent, try these truffles! Enjoy.
Recipe for Dark Chocolate Red Wine Truffles with Sea Salt or Sugar
INGREDIENTS
For the filling
8 ounces of heavy whipping cream
8 ounces of finely chopped semisweet chocolate
2 – 3 Tbsp. of red wine (cabernet sauvignon)
For dipping and topping
8 ounces of semisweet chocolate
Coarse sea salt and/or decorative sugar
DIRECTIONS
For the filling To finely chop the chocolate, break it up and put it in the bowl of a food processor. Pulse until it is very finely chopped.
Put the cream in a saucepan and set over medium low heat. Bring it to a simmer, watching constantly. Once it simmers, immediately remove from heat. Pour in the 8 ounces of finely chopped chocolate, cover the pan, and let rest for 5 minutes. After 5 minutes, remove the lid and use a spoon to slowly and gently stir until cream and chocolate are fully combined. Stir in the wine and again gently stir until well combined. Transfer the mixture to a bowl, cover, and put in fridge for several hours (preferably overnight).
After filling has chilled, you are ready to roll into balls. Line a freezer safe container with parchment paper or foil. Use a 1-inch cookie dough scoop to scoop up the filling and use your hands to roll into balls (I usually dust my hands with cocoa powder several times and have paper towels close by during this step – it gets messy). Once you have used all the filling, cover the balls with foil or a lid and put into the freezer. Allow to rest in the freezer for at least 4 hours, preferably longer. For dipping Line a baking sheet with parchment paper. Place the decorative sugar on a small plate and the sea salt on another small plate, and have a small spoon to use for each.
Coarsely chop or break the remaining 8 ounces of semisweet chocolate and place it into a medium sized saucepan. Prepare a double boiler and place the double boiler over medium heat. Place the saucepan with chocolate on top of the double boiler. Stir frequently, until chocolate is smooth and completely melted. Take the balls out of the freezer and turn the heat off.
Drop 1 or 2 balls into the melted chocolate and use a spoon to fully coat each one with the chocolate. Use the spoon to drop the coated truffles onto the baking sheet. Sprinkle the salt and/or sugar onto the tops of the truffles while the chocolate is still wet. Repeat with the remaining truffles. Put the baking sheet with the truffles in the fridge and allow them to harden before eating.
Recipe makes approximately 20 – 25 truffles.
NOTE: One thing I have noticed about dipping these truffles is that the dipping chocolate can get messy quickly. If you have the time, it helps to dip the truffles in two parts. Leave half of the truffles in the freezer, melt only 4 ounces of the chocolate and dip only half the truffles. Then melt the remaining 4 ounces and dip the last half of the truffles.
Okay, warm chocolate pudding cakes are seriously one of the best things I have ever tasted in my life. For real. If you are a diehard chocolate lover, you really need to make this dessert.
I made these chocolate pudding cakes for the first time during some snow days I had years ago. On snow days, I always love to make new meals or treats. I found this recipe in a cookbook, Scharrfen Berger “The Essence of Chocolate” cookbook. These warm chocolate pudding cakes are rich and chocolatey but not too sweet – and they are the ultimate comfort dessert. I hope you enjoy these amazingly scrumdiddlyumptious warm chocolate pudding cakes.
Recipe for Warm Chocolate Pudding Cakes with Whipped Cream & Cacao Nibs
INGREDIENTS
For preparing ramekins: Unsalted butter, cocoa powder
3.5 ounces of 99% unsweetened chocolate, finely chopped
1 cup of heavy whipping cream
4 Tbsp. of unsalted butter, cut into 1-inch cubes
2/3 cup granulated sugar
1 Tbsp. cornstarch
1/4 tsp. salt 2 eggs
For topping: 1/2 cup heavy whipping cream, cacao nibs
DIRECTIONS
Adjust oven so that a rack is in the middle position and then preheat to 325 degrees.
Butter 4 – 5 ramekins or oven safe bowls that hold at least 6 ounces. Dust the bottoms and sides of each one generously with cocoa powder, making sure to tap out the loose excess powder.
Put the heavy whipping cream and cubed butter into a medium-sized pan. Place over medium heat and bring to a simmer. Once it simmers, immediately add in the finely chopped chocolate. Remove from heat and allow it to sit for one minute. Then whisk the mixture until the chocolate is completely melted and the mixture is nice and smooth.
In a large bowl, sift the sugar, cornstarch, and salt together. Add in the eggs and whisk. While whisking, add in the melted chocolate and mix until well incorporated. Place a fine mesh strainer over top a 4-cup liquid measuring cup. Pour the mixture through the strainer. You will get about 3 cups of batter in the measuring cup. Pour the batter into the prepared ramekins/oven safe bowls. Place them onto a baking sheet and put into the oven. Cook for 30 – 35 minutes, or until the tops are puffed up and slightly cracked. Allow to cool for 10 – 15 minutes.
While the pudding cakes are cooling, make the whipped cream. Place 1/2 cup of heavy whipping cream into a metal bowl and use an electric hand mixer set on high speed to mix until stiff peaks form. Top each pudding cake with a couple tablespoons of whipped cream and some cacao nibs.
*These are best when warm. If you save them, cover tightly with plastic wrap and store in fridge. Place in microwave for about 25 – 30 seconds before eating.
As many of my friends know, I love truffles. When I am craving truffles and want to make them quickly, I go for this recipe because it requires very little hands-on time. These truffles do not require the step of dipping in chocolate, because they are rolled and dusted in cocoa powder. You can also coat them in powdered sugar, nuts, coconut, or anything else that sounds good to you! Some of my favorites to coat in are cacao nibs and toasted coconut. I hope you will love these easy chocolate truffles. Enjoy!
Recipe for Easy Chocolate Truffles (made with cocoa powder)
INGREDIENTS
1 1/2 sticks of unsalted butter
3/4 cup of cocoa powder
1 can of sweetened condensed milk
1 Tbsp. of vanilla
Cocoa powder or powdered sugar for rolling
Add-ons for rolling (toasted coconut, cacao nibs, nuts) – optional
DIRECTIONS
Put the butter in a small saucepan set over low heat. Allow the butter to melt completely. Once the butter has melted, stir in the cocoa powder. Stir until the mixture is completely smooth. Increase the heat to medium and immediately add in the sweetened condensed milk. Stir the mixture constantly for about 3 minutes. Remove the saucepan from the heat and then add in the vanilla. Carefully pour the mixture into a heat safe container and cover it tightly. Place in the fridge for a few hours or more.
When ready to shape the truffles, take out a baking sheet and cover it with parchment paper. Make sure to have your cocoa powder, powdered sugar, or add-on ingredients ready. (I placed about 1/2 cup of cocoa powder and 2 Tbsp. of cacao nibs in a bowl for the cacao nib truffles, and I placed the toasted coconut in the baking pan for the coconut truffles.)
Use a cookie dough scoop to scoop up some of the truffle mixture. Slightly shape, and then generously dust and roll the truffle in the powder mixture or add-on mixture. Roll with your hands into desired shape. Place the shaped truffle on the parchment paper, and repeat dusting, rolling, and shaping truffles with the remaining mixture until it is gone.
Put the truffles in the fridge to allow them to harden a bit. Once hardened, place the truffles in an airtight container. Store the truffles in the fridge until ready to eat. Makes about 2 dozen delicious truffles. Recipe Source: Hershey’s
To toast the coconut, preheat oven to 325 degrees. Place desired amount of sweetened flaked coconut in a baking pan and spread it evenly over the pan. Place the pan in oven & cook for about 15 minutes, or until coconut is lightly browned.
Cookie dough truffles get the first prize as being the fan favorite, but for coconut lovers, these coconut truffles are the winner. I’ve been told by these coconut lovers that the coconut truffles are way better than Mounds or Almond Joy bars, and even quite a few non-coconut lovers even go back for seconds. These are so delicious! Just do the coconut if you want it to more more mounds-like. To create an Almond Joy effect, add in the toasted almond. You really can’t go wrong either way. Enjoy!
Recipe for Coconut Truffles
INGREDIENTS
1 14-ounce bag of sweetened shredded flaked coconut 1 can of sweetened condensed milk 3 – 4 Tbsp. of all-purpose flour 2 tsp. of vanilla extract 1 1/4 tsp. of almond extract 16-ounces of semisweet baking chocolate squares, broken in half Toasted almond, whole or cut in half (optional)
DIRECTIONS
Place the coconut, condensed milk, almond extract, vanilla extract, and flour in a large mixing bowl. Mix together until well incorporated. Cover the bowl and put into the fridge for 2 hours or more. Line a few containers with parchment paper. Once the mixture is chilled, use a cookie dough scoop to roll 1 to 1 1/2-inch balls and place each one into the prepared containers. If using the almonds, press one almond in the middle of a coconut ball so it sticks (the ball may flatten, but that is ok). Cover the containers with foil and place in the freezer for 2 hours or longer. Place chocolate squares into a small saucepan. Place a double boiler filled one-quarter full with water over the stovetop set on medium-high heat. When the water simmers and you see steam, put the saucepan with the chocolate on top of the double boiler. Let the chocolate melt completely, frequently stirring until it is melted. Take one container of the coconut balls out of the freezer. Remove the melted chocolate from heat. Use a spoon to drop one or two coconut balls into the melted chocoalte. Coat entirely with the chocolate, and then place one a baking pan lined with a silicone baking mat or parchment paper. Continue dipping until each coconut ball is coated, and then repeat the process with the rest of the frozen coconut balls (taking one container out of the freezer at a time). Once all are coated, place the baking sheet in the fridge to cool and allow the chocolate to harden. They will be ready to devour within 30 minutes or less. ENJOY!