Baked Chicken Taquitos

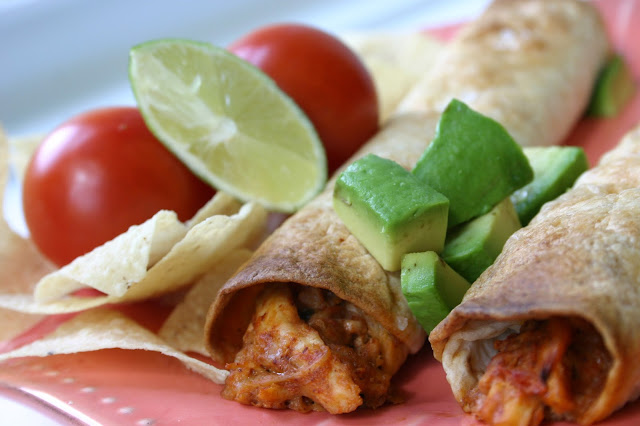
Mmm, baked chicken taquitos! This is one of my go-to meals when I am making dinner for a large crowd. Sometimes I add in quesadillas and extra sides to the meal if there are some big eaters in the group. I have been making these taquitos for years now, and they are always a hit. Baking taquitos is so much better than frying them – it is much healthier and there is barely any mess to clean up! These taquitos are filled with a slightly spicy and creamy chicken mixture. They are absolutely amazing. I usually serve them with some chips, salsa, sour cream, and avocado (or guacamole) on the side. If you don’t have time to make the homemade salsa, just use a good jarred salsa in its place. This meal is fairly quick and easy – and absolutely delicious! Enjoy.

Recipe for Baked Chicken Taquitos

INGREDIENTS

3.5 ounces of cream cheese, softened at room temperature
3 Tbsp. of your favorite jarred salsa
1/2 Tbsp. of freshly squeezed lime juice
1 tsp. of chili powder
1/2 tsp. of cumin powder
A pinch of cayenne pepper
2 cloves of garlic, minced
1 1/4 cups of grated cheese (I usually use a blend of pepper jack & cheddar)
2 cups of cooked chicken, shredded
10 flour tortillas (6-inch)
Cooking spray or olive oil
Coarse sea salt
Avocado, salsa, sour cream (for serving)

DIRECTIONS

n a large bowl, mix together the cream cheese, super salsa, lime juice, chili powder, cumin powder, cayenne pepper, garlic, cheese, and chicken. Mix until ingredients are well incorporated.

Line a baking sheet with foil and preheat the oven to 425 degrees.

Heat the tortillas in a microwave for several seconds to allow them to soften so they are easy to work with. Spread 3 Tbsp. of the mixture down the middle of one tortilla, then roll the tortilla tightly. Continue filling tortillas until you have used all of the mixture. Place each one on the prepared baking sheet. Lightly oil or spray the tops of the taquitos with oil or cooking spray. Then sprinkle the tops of each one with just a tiny amount of coarse sea salt. Place in the oven and cook for 15 – 20 minutes. Watch carefully so that they do not burn!

Serve immediately.

Recipe Source: Annie’s Eats

Advertisement

Ice Cream Cone Cupcakes with Chocolate Buttercream Frosting

Have you ever had cake, in a cone? If you haven’t, you are missing out! These ice cream cone cupcakes are one of my all-time favorite treats. First off, they are really cute and fun to eat. Second, the frosting on these cupcakes is absolutely incredible!
When I was a kid in elementary school, I definitely wasn’t the coolest kid around (but who was?). However, right before the winter holiday I became instantly cool, because I would bring in birthday cupcakes to share. The kids in my class would look forward to the birthday celebration, because I always came in with the best treats – like these ice cream cone cupcakes! That was back in the day where we were still allowed to celebrate birthdays in school!

These cupcakes are pretty easy to make. The cake batter is simply from a box – I use a super moist vanilla cake mix. After making the batter, you just fill up the cones and bake like cupcakes. The frosting also requires barely any time to make. I LOVE this frosting. It seriously has the consistency of soft serve ice cream and it melts in your mouth (not in your hands).

I am always excited to have an excuse to make these ice cream cone cupcakes. Kids think this treat is extra special! I am sure you and everyone else you know will love this fun and tasty treat! Enjoy!

Recipe for Ice Cream Cone Cupcakes with Chocolate Buttercream Frosting

INGREDIENTS

For the ice cream cone cupcakes:
24 ice cream cone cups
1 box of super moist vanilla cake mix
Ingredients to add to cake mix (according to box directions)

For the frosting:
2 7-oz containers of marshmallow fluff
2 sticks of unsalted butter, softened at room temperature
3/4 cup of chocolate chips, melted and cooled
2/3 cup of cocoa powder
1 Tbsp. of vanilla extract
1 Tbsp. of water

DIRECTIONS

For the ice cream cone cupcakes:
Make the batter according to package directions. Spoon batter into ice cream cone cups, filling them 2/3 – 3/4 full with batter. Place cones on a baking sheet, or inside a ice cream cone cup holder and place the holders on top of the baking sheet. Bake ice cream cone cupcakes according to package directions. When cupcakes are finished baking, remove from oven to cool completely.
For the chocolate buttercream frosting:Once the ice cream cone cupcakes are completely cooled and you are ready to frost, make the frosting. Put the chocolate chips into a small saucepan and set over medium-low heat. Stir occasionally until chocolate chips are fully melted and smooth. Remove from heat and set aside to cool.

In a large mixing bowl, beat the softened butter and marshmallow fluff together, using a hand mixer on medium-low speed. Beat until mixture is fluffy. Add in the cocoa powder, cooled chocolate, vanilla, and water. Beat until well incorporated.

Once cupcakes are completely cooled, frost with the buttercream. Use a spoon to scoop up generous amounts of frosting onto the cones, and then spread. Top with sprinkles, if desired. Store cupcakes in fridge.

Chocolate Buttercream Frosting Recipe Adapted from: Martha Stewart
NOTE:
Although the ice cream cone cakes and frosting are very easy to make, they are a bit difficult to store. One problem is that they have a tendency to fall over easily. I’d suggest storing/transporting them in baking cups. I couldn’t find the silicone baking cups, but this nifty ice cream cone cupcake rack will also do the trick!

*Another bonus of ice cream cone cupcakes – no paper trash from cupcake liners*

Curried Pumpkin Mushroom Soup

Here is a delicious pumpkin soup recipe. An old coworker of mine had sent me the recipe for this soup. I remember questioning how it would taste when she told me it was a recipe for pumpkin soup with mushrooms. She told me that a nice restaurant in Delaware is famous for the recipe, so that persuaded me to want to try it out. The soup did not disappoint. It’s creamy, hearty, a tad spicy, and soulful. It’s also fairly healthy, since pumpkin is packed full of Vitamin A and mushrooms are high in riboflavin, niacin, and selenium. Greg and I love this soup, and I hope that you love it too! Enjoy.

Recipe for Curried Pumpkin Mushroom Soup

INGREDIENTS

  • 5 TBSP Unsalted Butter
  • 1/2 of a large yellow onion, chopped
  • 8 ounces of sliced mushrooms (baby bella or cremini)
  • 2 Tbsp. of all-purpose flour
  • 1 Tbsp. of curry powder
  • 4 cups of chicken broth
  • 1 16-ounce can of pumpkin
  • 2 Tbsp. of honey
  • 1 Tbsp. of dark brown sugar
  • A dash or two of nutmeg
  • Salt
  • Freshly ground black pepper
  • 2/3 cup of heavy cream

DIRECTIONS

Melt butter in a large pot over medium-low heat. Add in the onions and mushrooms and saute over medium heat until softened, about 4 – 5 minutes. Stir in the flour and curry powder. Stir constantly for about 45 seconds and make sure to scrape the bottom of the pan so the flour doesn’t stick to it. Slowly mix in the chicken broth. Add in the pumpkin, honey, brown sugar, nutmeg, salt, and pepper. Stir together and cook for 5 minutes over medium heat, then adjust the heat to medium-low. Simmer the soup for about 10 minutes, stirring frequently. Mix in the heavy cream and cook soup for one more minute. Serve immediately – makes 6 – 8 servings.

Recipe Adapted from: Delaware Online

Sweet Potato Tacos

I love all kinds of tacos! My sister and brother-in-law are both vegetarian, so these sweet potato tacos are a great meal for when they come to visit.

I first had sweet potato tacos at Paladar Restaurant in Annapolis, Maryland. They were so good that I asked for the recipe from Paladar, and the executive chef sent me a version of the recipe. I have made them several times and they never disappoint. Enjoy!

Recipe for Sweet Potato Tacos

INGREDIENTS

  • For the filling:
  • 1 1/2 Tbsp. of Extra-Virgin Olive Oil, divided
  • 2 large sweet potatoes, peeled and then diced in 1/4-inch cubes
  • 4  hearts of palm stalks from a can, cut lengthwise and then sliced in to desired size 
  • 1 can of pinto beans or great white northern beans, drained well
  • Salt and pepper
  • 2 tsp. of cinnamon
  • For the tomatillo salsa:
  • 6 fresh tomatillos, husked
  • 1/4 of one bunch of fresh cilantro
  • 1/2 red onion OR 1 – 2 thin slices of a jalapeno pepper
    1 lime, juiced
  • For the toppings:
  • Red cabbage
  • Chopped Chives
    8 – 10 soft tortillas (6-inch/taco size)

DIRECTIONS

Make tomatillo salsa first. Place tomatillos, cilantro, and onion in the bowl of a food processor. Pulse until it is to salsa consistency. Pour in to a bowl, squeeze in the lime juice, cover and put in fridge for an hour. In a bowl, mix together the sweet potatoes, hearts of palm, 2 1/2 tsp. olive oil, and salt and pepper. Place the potato mixture on a foil-lined baking sheet, and bake in the oven at 350 degrees for 25 – 30 minutes (until potatoes are done). Put the rest of the olive oil in to a large skillet. Heat oil, then add potato mixture and pinto beans to the skillet. Add in some salt, pepper, and the 2 tsp. of cinnamon. Saute until the beans and potatoes are warmed through, then remove pan from heat. Heat tortillas in a microwave for 20 – 25 seconds. Build your own tacos. Put sweet potato mixture down the middle of the tortilla, then top with cabbage, chives, and tomatillo salsa. Serve with mango and avocado salad (recipe to be posted soon). Enjoy!

Coconut Truffles

Cookie dough truffles get the first prize as being the fan favorite, but for coconut lovers, these coconut truffles are the winner. I’ve been told by these coconut lovers that the coconut truffles are way better than Mounds or Almond Joy bars, and even quite a few non-coconut lovers even go back for seconds. These are so delicious! Just do the coconut if you want it to more more mounds-like. To create an Almond Joy effect, add in the toasted almond. You really can’t go wrong either way. Enjoy!

Recipe for Coconut Truffles

INGREDIENTS

1 14-ounce bag of sweetened shredded flaked coconut
1 can of sweetened condensed milk
3 – 4 Tbsp. of all-purpose flour
2 tsp. of vanilla extract
1 1/4 tsp. of almond extract
16-ounces of semisweet baking chocolate squares, broken in half
Toasted almond, whole or cut in half (optional)

DIRECTIONS

Place the coconut, condensed milk, almond extract, vanilla extract, and flour in a large mixing bowl. Mix together until well incorporated. Cover the bowl and put into the fridge for 2 hours or more. Line a few containers with parchment paper. Once the mixture is chilled, use a cookie dough scoop to roll 1 to 1 1/2-inch balls and place each one into the prepared containers. If using the almonds, press one almond in the middle of a coconut ball so it sticks (the ball may flatten, but that is ok). Cover the containers with foil and place in the freezer for 2 hours or longer.
Place chocolate squares into a small saucepan. Place a double boiler filled one-quarter full with water over the stovetop set on medium-high heat. When the water simmers and you see steam, put the saucepan with the chocolate on top of the double boiler. Let the chocolate melt completely, frequently stirring until it is melted. Take one container of the coconut balls out of the freezer. Remove the melted chocolate from heat. Use a spoon to drop one or two coconut balls into the melted chocoalte. Coat entirely with the chocolate, and then place one a baking pan lined with a silicone baking mat or parchment paper. Continue dipping until each coconut ball is coated, and then repeat the process with the rest of the frozen coconut balls (taking one container out of the freezer at a time). Once all are coated, place the baking sheet in the fridge to cool and allow the chocolate to harden. They will be ready to devour within 30 minutes or less. ENJOY!

***Original Recipe***

Cookie Dough Truffles

Years ago, I would have never thought I would be able to make homemade truffles. Now I have kind of been addicted to making truffles for quite awhile! I first learned how to make cookie dough truffles. Since then, I’ve made several different types of truffles. These cookie dough truffles are a fan favorite out of all the truffles I have made. I have not met anyone who does not like them, unless they just don’t like chocolate (and that’s just weird). Now, you can learn how to make truffles too!

The cookie dough truffles are amazingly good and totally addicting. The best part is that they taste exactly like cookie dough covered in chocolate (wow), but there is no raw egg in the mixture, so no worries about salmonella. The cookie dough mixture all sticks together using sweetened condensed milk, which also plays a big role in making them so delicious.

I think it is only fair to add this warning to this truffles posting, so here it is: Once you learn how to make truffles and they are shared with your friends, they will always ask you to make them. Any time you are invited to a potluck, baby shower, wedding shower, or other food-centered event – you will be going with truffles in hand! Enjoy.

Recipe for Cookie Dough Truffles

INGREDIENTS

1 stick of unsalted butter, softened at room temperature
3/4 cup of light brown sugar
1 can of sweetened condensed milk
2 1/4 cups of all-purpose flour
1 tsp. of vanilla extract
3/4 cup of semisweet OR milk chocolate chips (mini or regular size)
16 ounces of semisweet baking chocolate squares OR 15 ounces of milk chocolate baking squares

DIRECTIONS

Place the butter and brown sugar into a large mixing bowl. Use a hand mixer set on medium-low speed to cream the butter and sugar together until smooth. Add in the condensed milk, flour, and vanilla extract to the mixture and mix to incorporate well. Fold in the chocolate chips. Cover the bowl and place in the fridge for a few hours.
Once chilled, use a cookie dough scoop to roll the cookie dough batter into 1 1/2-inch balls. Place each ball in a container lined with aluminum foil (you might need more than one container). Cover each container used with foil, and place in the freezer for 2 hours.
When ready to dip the balls, place the chocolate squares into a small saucepan. Place a double boiler filled one-quarter full with water over medium-high heat. Once it begins to steam, place the pan of chocolate on top. Stir the chocolate until it is fully melted. Take one container of frozen cookie dough balls out of the freezer. Remove chocolate from heat. Using a spoon, drop in one or two of the cookie dough balls at a time into the melted chocolate. Fully coat with the chocolate, then drop onto a baking pan lined with a silicone mat or parchment paper. Repeat steps with the rest of the frozen cookie dough balls. Once all are coated and on the baking pan, place the pan into the fridge to allow the chocolate to harden more. They should be ready to indulge in within 30 minutes or less. Try to eat just one – I dare you!

Recipe Source: Annie’s Eats

Coconut Macaroons – No Egg!

I really like to make macaroons because they are easy to make and because Greg loves them so much. I can remember eating my mother’s macaroons as a child. When I got married I asked her about the recipe, and she told me  to search the web for recipes that use condensed milk rather than egg whites. And so the searching and baking began…

It took me quite a while to perfect the macaroon recipe. Although the macaroons have always tasted delicious, they would spread way too much and get really gooey.  To prevent the spreading, I learned to add flour to the batter. It is also an absolute MUST to bake the macaroons on a baking sheet lined with parchment paper or a silicone baking mat, otherwise they will stick to the pan and be destroyed – and that would be very sad.

After making macaroons and handing three of them to Greg with a glass of milk, I asked him to describe the macaroons for me. All he could come up with was: “they are good and coconutty.” No wonder he has never written me any love poems…

To get a better description, I asked a friend. She described them like this: “It is funny because I am not sure I have ever considered myself a coconut lover but the macaroons are so amazingly good and addicting – I can never have one or even two for that matter. They are sweet, but they also have a toasted nutty flavor that is irresistible. They are chewy but they melt in your mouth at the same time. Ohhh, so yummy!”

These macaroons really are pretty incredible. Even if you’re not a coconut lover, you will fall in love with them – I promise!

Recipe for Coconut Macaroons

INGREDIENTS

1 14-oz bag of sweetened shredded flaked coconut
1 can of sweetened condensed milk
1 1/2 tsp. almond extract
2 tsp. vanilla extract
2 – 3 Tbsp. of all-purpose flour

DIRECTIONS

In a large mixing bowl, mix together the coconut, condensed milk, flour, almond extract, and vanilla extract until well incorporated. Cover and put bowl in the fridge for several hours; overnight if needed.

Use a cookie dough scoop to scoop batter and then roll with your hands to form 1 1/2-inch balls. Place each ball on baking pans lined with a silicone baking mat or parchment paper, leaving about 1-inch of space in between each.
Preheat oven to 330 degrees. Bake for 20 – 23 minutes, or until the tops are golden brown.
Immediately transfer macaroons to a plate. Enjoy!

*Makes about 2 1/2 dozen cookies.-Recipe adapted from various sources & then adjusted to my preference-

Maryland Lump Crab Cakes

Once upon a time, I used to be a part of sailboat racing with my husband, Greg. As I had never sailed until I met him back in 2006 and never quite got the itch, often times I would make snacks and treats for the crew on the team. One weekend, we hopped aboard a friend’s sailboat and raced to Oxford, Maryland. The race was quite wild, and I was hoping that the start would be the most exciting part of the day, but the entire race was a crazy ride. We had endured winds of up to 42 mph, and it was kind of (really) scary. Later that night we dined at the Robert Morris Inn, in the Tred Avon dining room. It was a lovely meal with very fun people. We ate delicious food including Maryland crab cakes. I decided when I got home from the race to recreate crab cakes at home.

Making crab cakes is actually pretty easy. There is not much prep time and they cook in under 30 minutes. I recommend buying pre-picked crab meat that is ready to eat – this will make the process much easier! Also, make sure to buy pretty high quality crab meat for your crab cakes. The price might make you cringe, but it is worth it. Plus, making crab cakes at home is always much cheaper than ordering them at a restaurant. If you want to pay the extra money, go ahead and buy the jumbo lump crab meat in place of the lump crab meat. The butter sauce on these crab cakes is also a really nice touch. I drizzled a little on top of each crab cake and then squeezed on some extra lemon juice. So yummy!

Recipe for Maryland Lump Crab Cakes

INGREDIENTS

1 medium egg
1 tsp. of fresh parsley leaves
1 tsp. of dried parsley leaves
1/4 tsp. of kosher salt
a few grinds of freshly ground black pepper
1 tsp. of Old Bay Seasoning
3/4 tsp. of Grey Poupon mustard
1 1/2 tsp. of Worcestershire sauce
1/2 tsp. of freshly squeezed lemon juice
1 1/2 Tbsp. of mayonnaise
8 ounce container of ready to eat lump crab meat, drained of juices
6 – 8 saltine crackers, crushed
a small pat of butter for each crab cake

DIRECTIONS

Adjust your oven so that a rack is on the top, closest to the heat source. Preheat oven to 375 degrees.

Crack the egg into a large bowl and then use a fork to beat the egg well. Add in the fresh parsley, dried parsley, salt, ground pepper, Old Bay seasoning, Grey Poupon mustard, Worcestershire sauce, and lemon juice. Mix the ingredients together. Fold in the crab meat and mayonnaise and mix. Add in 6 of the crushed saltine crackers and mix well. If the mixture does not appear to stick together well enough for forming into patties, mix in the other 2 crushed Saltine crackers (more if needed).

Use a large spoon to scoop out desired amount of the crab mixture and then form with your hands to make a patty/cake. Place the crab cake onto a baking sheet. Repeat until you have used all of the crab mixture (I made 4 regular-sized crab cakes with the mixture). Place a very small pat of butter on top of each crab cake and then sprinkle each one with a dash of black pepper. Place the baking sheet on the top rack of the oven and bake for 12 – 15 minutes. Then, using a spatula, very carefully loosen the bottom of each crab cake from the pan but do not flip. Rotate the pan and cook for another 10 – 12 minutes, or until the cakes are golden brown.

Serve with lemon-parsley butter sauce (recipe below) and a squeeze of fresh lemon. Eat with your favorite sides (we had oven-baked potato fries and a spinach salad). Enjoy!

Recipe Adapted from: The Chesapeake Bay Crabbiest Cookbook

Lemon Butter Parsley Sauce

INGREDIENTS

1/2 stick of unsalted butter
1 Tbsp. of fresh parsley leaves, chopped
2 tsp. of freshly squeezed lemon juice
2 tsp. of white cooking wine
1/4 tsp. of salt
1/4 tsp. of black pepper
1/2 tsp. of Worcestershire sauce
a dash of Sriracha hot sauce

DIRECTIONS

Melt the butter in a small saucepan over low heat. Once butter has melted, add in all of the other ingredients. Simmer together on low heat for about 45 seconds. Drizzle butter sauce on crab cakes or serve on the side for dipping.

Recipe Adapted from: The Chesapeake Bay Crabbiest Cookbook

Eggs Baked in Avocado

Eggs baked in an avocado. Eggs baked in an avocado. Eggs baked in an avocado. Go make it! Cut an avocado in half, take out the pit, squeeze in some lime juice, crack in the eggs, bake, and top! I cannot believe I waited so long to try out this meal. I had told myself over and over again that I was going to try it and glad I finally did. Now eggs baked in an avocado is a go to meal. Eggs and avocado are both considered brain food, and I need all the brain food I can get these days. The first time I tried it out, I liked it, but I wasn’t head over heels in love with it. I think I liked the idea of eating it because it is so healthy, and since it is super healthy, I kept making it for myself. Now I am completely passionate about eggs baked inside of avocados. It is easy to make, low carb, high protein, filled with Omega 3s, gluten-free, well, you get the idea. So stop dragging your feet, and go make yourself some eggs baked in an avocado! You will thank me one day for telling you to try it. Enjoy.

Recipe for Eggs Baked in Avocado

INGREDIENTS

Eggs baked in avocado. Just do it.

1 Hass avocado (any size, I’ve been using smallish ones lately), cut into half lengthwise with pit removed
Juice of 1/2 lime
2 eggs
Extra-virgin olive oil
Crushed red pepper flakes, salt & pepper
Sriracha sauce
Fresh Herbs (thyme, dill, parsley, whatever you want)

DIRECTIONS

Preheat the oven to 400 degrees. Line a baking sheet with foil.
Scoop out some of the avocado from each half so that there is enough room for the egg in each. Squeeze desired amount of lime juice over each avocado half. Sprinkle each  with salt and pepper. Crack one egg into one half of the avocado. Don’t worry if some of the white runs out, you just want to make sure the yolk is in the avocado. Crack another egg into the other half of the avocado. Place in oven and bake for 12 – 14 minutes, depending on how runny you like your yolks. Make sure the egg whites are set and not runny, though! Remove from oven and drizzle with olive oil and sriracha sauce. Sprinkle with salt and pepper, crushed red pepper flakes, and fresh herbs.
Grab a fork or spoon and dig in (make sure you only eat the fruit of the avocado and the eggs – discard the peel)!

Recipe Adapted from: Serious Eats

The Best Cream of Crab Soup

This soup is possibly the best cream of crab soup I have ever had, and I have had a lot of cream of crab soup in my day, because I live in Maryland! I found the recipe in a cookbook called “The Chesapeake Bay Crabbiest Cookbook,” and it was one of 22 crab soup recipes. I thought the cookbook was the right place to look for my cream of crab soup recipe, especially since I loved a crab cake recipe I had recently used from the book. The soup was easy to make and it tasted amazing. Greg exclaimed how much he liked it, and then after eating it for awhile, he turns to me and says “um, so how unhealthy is this soup, because it seems really rich.” And I was like, “um, well it is CREAM of crab soup, and why do you have to take the fun out of everything?” I then explained to him that although it did have heavy cream, that is was thickened because a flour roux was added to the soup. It is the roux that makes this soup so nice and thick (but of course it’s the cream that makes it so deliciously, um, creamy).  I ended up using crab claw meat for the soup and it worked out well. You can choose to add the sherry, but I don’t think it is necessary. I do recommend sprinkling it with some extra black pepper and Old Bay Seasoning before serving. Oh, and make sure you have some toasty bread or crackers for dipping. Enjoy.

RECIPE FOR THE BEST CREAM OF CRAB SOUP

INGREDIENTS

4 Tbsp. of unsalted butter
1 small to medium yellow onion, minced
2 cloves of garlic, pressed
3 Tbsp. of all-purpose flour
3/4 tsp. of Old Bay Seasoning
1 1/4 tsp. of freshly ground black pepper
1 Tbsp. of ground yellow mustard
A pinch of cayenne pepper
1/2 tsp. of salt
16 ounces of heavy cream
16 ounces of half and half
1 pound of crabmeat (I used crab claw meat)
3 Tbsp. of sherry, optional
Parsley leaves for garnish, optional

DIRECTIONS

Melt the butter over medium-low heat in a large stockpot. Add in the diced onions and pressed garlic and stir. Stir frequently and cook until the onions come to a light golden color.
While the onions are cooking, put the flour, Old Bay Seasoning, black pepper, yellow mustard, cayenne pepper and salt into a smallish bowl and mix.
Once onions are light golden in color, adjust the heat to medium and then make a roux. Add the flour mixture in, and stir continuously to make a blond roux (until the mixture is light golden in color), about 3 – 4 minutes.  After the roux is made, pour in the cream and half and half. Bring it to a boil, and then stir in the crabmeat. Bring the soup back to a boil, and then immediately stir in the sherry, if using.
Ladle the soup into bowls. Sprinkle each with some extra black pepper and Old Bay Seasoning, and garnish with some parsley leaves, if desired.

Recipe makes approximately 6 servings. 

Recipe Adapted from: The Chesapeake Bay Crabbiest Cookbook, by Whitey Schmidt 

%d bloggers like this: