Cheesy Cherry Tomato Tart with a Basil-Garlic Crust

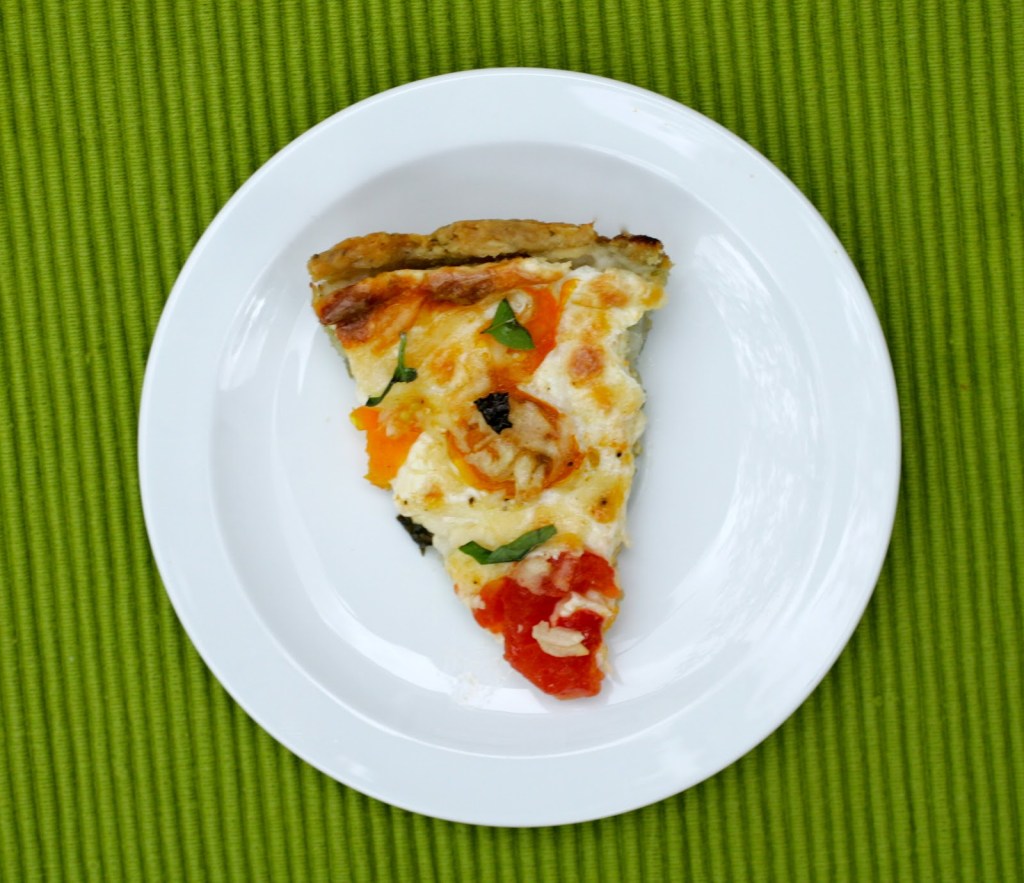
Today I am sharing one of my favorite summer-time recipes – a cherry tomato tart. I have been making this recipe every summer for the last eleven years now, and we always enjoy it so much. Tonight I made it and I topped it for the first time with crumbled bacon. I highly recommend adding bacon if you are a bacon lover!

I began cooking this cherry tomato tart because we used to have a garden that would produce tons of tomatoes. I had to figure out creative ways to use the tomatoes in our meals, even though just eating them off the vines was always enjoyable! We no longer have a garden, so I purchase a container of cherry tomatoes or grape tomatoes for this recipe.

The crust on this tart is made with basil and garlic and the flavor is incredible. The tart is then topped with lots of yummy cheese and tomatoes, then baked until the cheese is bubbly. It’s like a pizza, but better. If you so desire, you can top it with some crumbled sausage or bacon. We like both, but we especially love the bacon! Enjoy.

Recipe for Cherry Tomato Tart with a Basil-Garlic Crust

INGREDIENTS:

For the basil-garlic crust:
1/3 cup of fresh basil leaves
2 cloves of garlic
1 1/4 cups of all-purpose flour
1/2 tsp. of salt
8 Tbsp. of cold butter, cut into 8 pieces (I put butter in freezer for about 15 minutes before using)
5 Tbsp. of ice cold water

For the filling:
10 ounces of fresh mozzarella cheese, sliced into 10 pieces
1/2 cup of cherry or grape tomatoes, sliced thin
A dash or two of salt
Freshly ground black pepper
1 Tbsp. of Extra-Virgin olive oil
1/3 cup of fresh Parmesan cheese, grated
1 Tbsp. of fresh basil leaves, torn in small pieces

DIRECTIONS:
For the basil-garlic crust:
Put the fresh basil leaves and garlic in the bowl of a food processor fitted with a metal blade. Pulse the food processor until the basil and garlic are very finely chopped, scraping down the sides of the bowl with a spoon as necessary. Add in the flour and salt to the bowl of the processor. Pulse very briefly to just combine. Add in the cold pieces of butter. Pulse about 10 times, until the mixture looks coarse and crumby (crumbs should be about the size of peas). Add 3 Tbsp. of the ice cold water to the mixture and pulse to incorporate. Add 1 more Tbsp. of the water and let the processor run. If the mixture does not leave the sides and form into a ball quickly, add the remaining water. Once the mixture turns into a ball, take the dough out and flatten into a disc. Wrap tightly in saran wrap or place in a sealed Ziploc bag and place in the fridge for 45 minutes before handling.

While the dough is in the fridge, slice the tomatoes. Put the tomatoes in a colander set over a bowl. Add a dash of salt to the tomatoes and stir gently. Add another dash of salt if necessary and stir again. This is done in order to try to get as much moisture out of the tomatoes as possible. Give them a stir several times prior to using them in the tart.

After dough has sat in the fridge, transfer it to  *lightly floured work surface. Roll it into a 12-inch circle. Transfer dough to a 9-inch tart or pie pan and press dough up onto the sides. Prick the dough all over with a fork, making sure not to go all the way through. Preheat the oven to 425 degrees. Bake at 425 for 15 – 17 minutes, making sure to watch and prick with a fork as needed if the dough is rising up. Remove the pan from the oven and lower the temperature to 375 degrees.

**I actually just press the dough into the pie pan and work with my hands to evenly cover the bottom of the pan and press the dough up the sides.

For the filling:
Layer the the crust with the mozzarella slices. Arrange the cherry tomato slices on top of the mozzarella in a single layer. Top with a few grinds of freshly ground black pepper. Drizzle the 1 Tbsp. of olive oil over the tomatoes. Top evenly with the grated Parmesan cheese and torn basil leaves.

Bake in oven for 15 minutes at 375 degrees, then rotate the pan 180 degrees in the oven. Bake for another 10 minutes. If using bacon, about five minutes before the tart finishes cooking, add two to three pieces of cooked and crumbled bacon evenly over the tart, then return tart to oven to continue cooking. Let the tart sit for a few minutes to cool before cutting and serving. Yummy!

Recipe Adapted from: Annie’s Eats

Advertisement

Shrimp & Vegetable Enchiladas with a Creamy Poblano Sauce

I have a confession to make. I have a cooking blog and the truth is, there are so many things that I have never even attempted to make in the kitchen. When I made these shrimp enchiladas for the first time, I realized that I had actually never made enchiladas before! I seriously couldn’t believe that I had never made something as easy and delicious as enchiladas. I love enchiladas! I have had these enchiladas on my mind a lot lately, and I can almost taste them. I am going to need to make them very soon because it definitely seems like a craving! The nice thing about these enchiladas is that they are loaded with a lot of vegetables, and they taste absolutely scrumptious. All the flavors in the recipe come together so well. I hope you enjoy these enchiladas as much as we do, and please do not skimp on the amazing creamy poblano sauce!

Recipe for Shrimp & Vegetable Enchiladas with a Creamy Poblano Sauce

INGREDIENTS

For the roasted poblano pepper sauce
2 large poblano peppers

2 1/2 Tbsp. of unsalted butter
4 Tbsp. of all-purpose flour
1 1/2 cups of chicken broth
1/4 tsp. of garlic powder
1 cup of sour cream
1/4 cup of fresh cilantro, chopped
For the filling
1 1/2 Tbsp. of extra-virgin olive oil
1 very small yellow onion, finely chopped
2 cloves of garlic, pressed
1/4 tsp. of oregano
1/8 tsp. of cayenne pepper
2 cups of shredded green cabbage (I used a packaged coleslaw mix)
2 cups of shredded carrots (I used packaged shredded carrots for this – you can also peel and shred regular carrots)
3 cups of baby spinach leaves
2 chipotle peppers in adobo sauce, finely chopped and seeds removed (seeds have a lot of heat
1 pound of large Easy Peel and deveined Frozen Shrimp, thawed and coarsely chopped

For assembling
10 8-inch flour tortillas
8 ounces of grated Monterey Jack cheese

DIRECTIONS:
Roast the poblano peppers first. Preheat the oven to 475 degrees. Place the peppers on a baking sheet and put into the hot oven. Cook, for about 7 minutes, then use tongs to flip the peppers over. Continue cooking, flipping as needed and checking frequently, until the peppers are mostly blistered (about 20 minutes) Remove from oven and allow them to cool before handling. Lower the oven temperature to 400 degrees.

While the peppers are roasting, chop up the onion and chiplotle peppers and set aside. Grate the cheese and set aside. You can also thaw the shrimp if you haven’t already done so and peel and chop the shrimp and set aside.

Once peppers are cool enough to handle, make the sauce. Put the butter into a small saucepan over medium-low heat. While you are waiting for the butter to melt, carefully peel off the skin of the pepper and discard. Remove the seeds and stem and diiscard. Then coarsely chop the remaining pepper or use your hands to tear into pieces. Once the butter is melted, stir the peppers into the butter. Then add in the flour and stir constantly until the mixture is golden, about 1 minute or so. Add in the broth and garlic powder and cook, stirring often, until the sauce is thickened and bubbles up. Remove from heat and immediately stir in the sour cream and cilantro. Set aside.

Put a large skillet over medium heat and add in the olive oil. Once oil is hot, stir in the onions, garlic, oregano, and cayenne pepper and cook for about 5 – 7 minutes, or until onions are tender. Then add in the cabbage, carrots, and spinach. Cook, stirring frequently, until the spinach wilted, about 3 minutes. Add in the chipotle pepper pieces and the shrimp and cook for a couple minutes. Remember the shrimp doesn’t need to be fully cooked because it will continue to cook once in the oven. Remove skillet from heat.

Assemble your enchiladas. Choose an oven-safe 9 x 13 baking dish to arrange the enchiladas in. To make them easier to roll up, I recommend putting the tortillas between a paper towel and heating in the microwave for about 30 seconds first. Then use a workspace and spread about 1/3 cup or so of the shrimp mixture down the middle of the tortilla. Top with 2 – 3 tablespoons of the grated cheese. Then tightly roll up the tortilla around the filling and place on one side of the baking dish, seam side down. Continue doing this until you can no longer fit any enchiladas in your pan. Evenly pour the poblano sauce over the enchiladas. Place enchiladas in the oven and cook for 20 – 25 minutes, or until a bit browned and sauce is bubbly. Remove from oven and let cool for just a couple minutes before serving.

Recipe Source: Annie’s Eats

Recipe Makes Approximately 4 – 6 servings. They taste great leftover! Cover the baking dish you used for the enchiladas tightly with foil and store in the fridge. To reheat, cook at a low temperature (275 degrees) in the oven for about 20 minutes. 

Pasta with Creamy Red Sauce & Sausage

Here is a new recipe for Make It and Bake It with Beth, one that was never to be seen on Bake It and Make It with Beth! I was actually surprised that this recipe was not on the old blog. I had bought some italian sausage the other day, and I was craving this recipe last night. I started searching on the old blog, and I realized that I had never posted this recipe, even though it is one that we really enjoy in our home. Not only is this a good and satisfying meal, it is also pretty easy to make. This pasta dish has a creamy red sauce and lots of tasty pieces of italian sausage. I was running low on Parmesan cheese, so I barely used any at all, and so this ingredient is now totally optional! Greg had over three servings of this pasta dish last night!

You can add in fresh basil if you have it, too. In the past, I have used fresh basil in the recipe, but did not have any on hand. I was going to substitute dried basil but could not find any, so went with some dried oregano instead. We hope you will also love this flavorful, rich, and comforting pasta with creamy red sauce and sausage! Enjoy.

Recipe for Pasta with Creamy Red Sauce & Sausage

INGREDIENTS

  • 2 Tbsp. extra virgin olive oil
  • 1 pound of mild Italian sausage with casings removed
  • 1/2 tsp. of dried crushed red pepper flakes
  • 1 small yellow onion, finely chopped
  • 2 garlic cloves, minced (use a garlic press)!
  • 26 – 28 ounces of chopped tomatoes, such as Pomi
  • 1/2 cup heavy whipping cream
  • Salt and pepper
  • a pinch or two of dried oregano
  • 12 ounces of Penne pasta
  • fresh basil leaves (optional)
  • grated Parmesan cheese (optional)

DIRECTIONS

Put a large pot of water with a large pinch of salt over high heat to bring to a boil. While waiting on the water to boil, begin the sausage and creamy red sauce.

Heat the oil over medium-high heat in a very large skillet. Once oil is hot, add in the sausage. Break up the sausage, using a wooden spoon. Add in the crushed red pepper flakes. Continue breaking up sausage and cooking until the sausage is no longer pink in the middle and cooked through (about 6 – 9 minutes). Add the chopped onion to the pan and lower the heat to medium. Cook, stirring frequently, until the onions soften, about 4 – 5 minutes. Add in the minced garlic, stir, and cook for another minute. Then add in the crushed tomatoes, scraping up the browned bit on the bottom of the pan. Stir and cook for one minute. Stir in the heavy cream. Add salt, pepper, and dried oregano. Adjust heat to medium-low and allow sauce to simmer for 6 more minutes, stirring frequently. While the sauce is simmering, cook the pasta.

Once water comes to a boil, add the Penne pasta to the pot. Stir. Cook, according to the package directions, to al dente. Drain pasta in a colander. Add the pasta to the pan of sausage and creamy red sauce. Stir to coat. Add in the basil and Parmesan, if using. Serve pasta on plates or in bowls. Sprinkle on some freshly ground pepper, if desired. Enjoy!

Recipe Adapted from: Epicurious


Garlic Press  — saves tons of time when minced garlic is involved!

Easy Shrimp Scampi with Linguine

What do you consider comfort foods? I usually think of soups as go to comfort foods, and I only typically crave soup in the cooler weather. There are not as many comfort foods I associate with the warmer weather that comes in the spring and summer. We have had some warmer weather this week here in Maryland, even though it is still February! Today it was in the 60s, and it felt great. However, it is still February, so bring the comfort food on! One food that I consider “warmer weather” comfort food is shrimp scampi with pasta. I typically do not do pasta much, but I do love shrimp scampi with pasta. This meal is one that you can make in less than 15 minutes, and it tastes great. If you are cutting carbs, you can eat lots of the shrimp with a sprinkle of Panko bread crumbs and Parmesan cheese, and the carb lovers in the family can eat up all the pasta! If you are looking for an easy meal that is comforting, refreshing and satisfying, try this easy shrimp scampi over linguini pasta! Enjoy.

Recipe for Shrimp Scampi with Linguini

INGREDIENTS

  • 8 ounces of uncooked linguine or spaghetti noodles
    3 Tbsp. of unsalted butter
    1 pound of frozen medium shrimp, thawed, deveined, and peeled
    1/2 – 3/4 tsp. of crushed red pepper flakes
  • 1/4 cup of dry white wine or chicken stock
    Zest of one lemon 
    1/4 cup of freshly squeezed lemon juice (about one lemon)
    A pinch or two of kosher salt
    Freshly ground black pepper
    2 Tbsp. of chopped fresh parsley leaves
    1/2 cup of freshly grated Parmesan cheese
    Panko bread crumbs, if desired

DIRECTIONS

Cook the pasta according to package directions. When it is finished cooking, drain in a colander.

While the pasta is cooking, prepare the shrimp scampi. Melt the butter in a large skillet over medium-heat. Once it is melted, add in the shrimp, garlic, and crushed red pepper flakes.  Cook, stirring frequently, until the shrimp is pink (about 3 minutes). Then add in the wine or chicken stock and the lemon juice. Sprinkle on the salt and pepper. Give it a stir, then adjust the heat to medium-low and bring to a simmer. Once it comes to a simmer, remove from heat. Carefully add in the drained pasta, lemon zest, and parsley and toss.

Serve immediately. Top each serving with Parmesan cheese and Panko bread crumbs, if desired.

Makes approximately 4 servings. 

Recipe Adapted from: Damn Delicious, originally from Closet Cooking

Potato, Goat Cheese, & Chorizo Tacos with a Smoky Aioli

Here is a blast from the past! I made these with a friend on her 29th birthday, and she is 38 now! I remember when we had her over that night that she commented on the “interesting” things that were on the table for the tacos. As she was eating her tacos, she said “Wow Beth, I got to be honest, I was a little concerned when I saw everything out for the tacos. But it’s like the weirdest things come together and make this totally delicious combination of flavors!” I took it as a compliment.
I got the idea for the “weird” tacos from Paladar Restaurant. I had seen the meal on the menu there and really wanted to order them, but my date had other ideas. I decided I would try them out at home instead! Serve these tasty tacos with some refried beans and corn pudding. Enjoy!

Recipe for Potato, Goat Cheese & Chorizo Tacos with a Smoky Aioli

INGREDIENTS

  • 3 lb golden potatoes, peeled and cut into small chunks
  • 3 Tbsp. olive oil
  • salt and pepper
  • 2 lb chorizo sausage, casings removed
  • shredded red cabbage
  • cilantro
  • crumbled goat cheese
  • smoky aioli (recipe to follow)
  • 16 soft corn tortillas (soft taco size)

DIRECTIONS

Preheat oven to 425 degrees. Put the cubed potatoes on a baking sheet and toss with the olive oil, salt, and pepper. Roast the potatoes for 12 minutes, then use a spatula to loosen the potatoes and toss around. Put potatoes back in the oven for another 10 – 12 minutes, or until they are lightly golden brown. Leave the potatoes on the pan and set aside. Lower the oven temperature to 270 degrees. 

Cook the chorizo. Put into a large pan and use a spatula or spoon to crumble the sausage as it cooks. Cook until sausage is completely done and make sure it is crumbled small.

Once chorizo is fully cooked, put it onto the pan with the potatoes. Toss together. Put pan back into the oven while you prepare the fixings.

Put cabbage, cilantro, and goat cheese into small serving bowls. Make the smoky aioli (recipe below). Put tortillas on a plate and cover with a paper towel. Heat in the microwave on low for about 25 – 30 seconds. 

Once all the fixings are prepped, take the potatoes and sausage out of the oven and put into a serving dish. Put tortillas, cabbage, cilantro, goat cheese, potatoes & chorizo, and smoky aioli out and allow everyone to assemble their own tacos. 

Recipe for Smoky Aioli

INGREDIENTS:

  • 1/3 cup real mayonnaise
  • Juice of one lime
  • 1 garlic clove, pressed (or 1/2 tsp. of garlic powder)
  • 1 1/4 tsp. of smoked paprika
  • salt and pepper

DIRECTIONS:

Place all ingredients into a bowl and mix well.

California Pizza Kitchen Quinoa Salad with Arugula

A friend of mine and I used to get together for lunch twice a year at the California Pizza Kitchen. We would get together to celebrate our birthdays, but of course we would usually go months after one of us had a birthday (darn busy schedules)! We always enjoyed the phenomenal salad at the California Pizza Kitchen.

We would usually get the Miso Salad, but when they removed the crab from the salad, I had to try something new. This quinoa salad was new at the time when we dined there and it was delicious. When I got home, I recreated the recipe at in my kitchen.

Quinoa is a superfood with tons of fiber and protein, and it tastes wonderful in this salad. You will love the healthy feel of the salad and the yummy flavors! I was told after making it that it tasted like something you would order at a really nice restaurant, so that means I definitely accomplished my goal! It has been awhile since I made this, but I cannot wait for warmer days so I can recreate this one again. I hope you will also give it a try! Enjoy.

Recipe for California Pizza Kitchen Quinoa Salad with Arugula

INGREDIENTS

For the salad:
1/2 cup cooked quinoa, cooled
8 sun dried tomatoes in oil, cut small; plus 1 tsp. of oil from the sun dried tomatoes
3 ounces of feta cheese, cut into small chunks
1 1/2 cups of baby arugula leaves
1 bunch of asparagus, stalks cut off, cut into 1 1/2-inch slices
1 1/2 Tbsp. of toasted pine nuts

For the dressing:
1/3 cup of Extra-Virgin olive oil
2 Tbsp. of red wine vinegar
1/4 tsp. of kosher salt
1/8 tsp. of dried oregano leaves
A few grinds of freshly ground black pepper

DIRECTIONS

Wash the quinoa and then cook according to package directions. Once quinoa finishes cooking, drain any excess water. Transfer quinoa to a large bowl and set aside to cool.

While quinoa is cooling, prepare the dressing. In a smallish bowl, mix together the olive oil, red wine vinegar, salt, oregano, and pepper. Mix well.

Once quinoa has cooled, add the sun dried tomatoes, sun dried tomato oil, feta cheese, and dressing to the bowl. Toss well to  coat. Cover bowl and put into the fridge for about 30 – 45 minutes.

About 20 minutes before you are ready to serve salad, steam the asparagus. Put asparagus in a large saucepan and cover just barely with water. Put over medium heat and bring to a simmer, then lower the heat and simmer for 3 – 5 minutes. Asparagus is done when you can prick it through with a fork, but still tender. Don’t let it get too soft. Once asparagus is finished cooking, drain the water and transfer the asparagus to a plate to cool.

While the asparagus is cooling, toast the pine nuts.

When ready to serve the salad, take bowl out of the fridge. Mix in the 1 1/2 cups of baby arugula and toss. Divide the salad between 3 – 4 serving plates. Top each plate with asparagus and toasted pine nuts. Sprinkle with freshly ground pepper, if desired. Enjoy!

NOTE:
The California Pizza Kitchen quinoa salad recipe was made with a champagne vinaigrette. I think the red wine vinaigrette works just as well. I also omitted the red onions from the recipe, but you might want to add them to yours!!

Quiche with a Homemade Crust

I remember that my mom used to make the best quiches for dinner. Nobody’s quiche could ever compare to hers! I love homemade quiche. When I have hosted baby showers or had to take something in for a work breakfast, quiche is something that I like to make! This quiche recipe is so delicious. The crust is buttery, the filling is creamy, and every bite melts in the mouth!

I’ve made this recipe both with and without bacon. I definitely love bacon, but I think I actually like the quiche without the bacon the best. I added the option to add in the bacon to this recipe, though. One nice thing about this recipe is that you can make the crust ahead of time, cover with foil, and leave at room temperature before you do the filling. We love this recipe at our house, and I hope you love it too! Enjoy.

Recipe for Quiche with a Homemade Crust

INGREDIENTS

  • For the crust1
  • 1/3 cup of all-purpose flour
  • 1/4 tsp. of kosher salt
  • 1 stick of well-chilled unsalted butter, cut into several pieces
  • 2 – 3 Tbsp. of ice cold water
  • For the filling
  • 2 large eggs
  • 2 large egg yolks
  • 2/3 cup of heavy cream
  • 2/3 cup of whole milk
  • 1 cup grated Swiss cheese
  • 1/4 tsp. of salt
  • 1/4 tsp. of ground black pepper
  • a pinch or two of ground nutmeg1 cup of grated swiss cheese
  • 4 ounces of cooked bacon, cut into small pieces (optional)

DIRECTIONS

For the crust

Place the flour and salt into the bowl of a food processor fitted with a metal blade. Pulse a couple times to combine. Add in the pieces of butter to the bowl. Pulse several times until the mixture resembles coarse crumbs. With the food processor running, slowly pour 1 tablespoon of the water through the feed tube. Add in 1 more tablespoon of water. If the dough does not leave the sides of the bowl after several seconds, add in the remaining tablespoon of water. Once dough leaves the sides of the bowl and forms into a ball, turn the processor off. Carefully remove the ball of dough, slightly flatten it into a disc, and cover it in saran wrap. Place in the fridge for at least an hour. 
Remove the dough from the fridge. Press the dough into the bottom and up onto the sides of a 9.5-inch pie plate. Place the dough back in the fridge for 30 minutes. 
When ready to cook, preheat the oven to 375 degrees. Fit a piece of parchment paper into the pie plate to cover the dough on the bottom and the sides. Fill the pie plate with pie weights or dried beans. Place the pie plate into the preheated oven and cook for about 13 minutes. After 13 minutes, carefully remove the pie plate from the oven. Then carefully remove the parchment paper and pie weights/beans. Place the pie plate back into the oven and cook for another 8 – 10 minutes. Remove from oven and place on a cooling rack. While it is cooling, make the filling. 

For the filling

Place the eggs, egg yolks, cream, and milk into a medium-sized bowl. Use a fork or whisk to beat well. Add in the salt, pepper, and nutmeg and mix it in. Stir in the cheese. 

For assembling

If using the bacon, arrange it in a single layer on the bottom of the slightly cooled pie crust. Pour the egg, cream, and cheese mixture into the crust. (If not using bacon, just pour the egg mixture into the pie crust). Place back into the oven and cook for about 35 – 40 minutes, or until golden in color. The quiche will still wiggle a little in the middle – you can check doneness by inserting the edge of a butter knife into the middle of the quiche, if it comes out clean the quiche is done. Remove from oven and let it cool slightly before serving. Makes 8 one-piece servings. 


Recipe adapted from The Food Network, Emeril Lagasse 

Baked Zucchini Cakes

Greg absolutely loves these baked zucchini cakes. In fact, he was the one who told me that I should share this recipe on my previous blog and I know he wants to make sure it gets on this new blog, too. I am glad I had saved this recipe because it is a meal that we all enjoy. I had never really considered making something like these before, but when we used to have a garden, we would grow different vegetables. One year, our garden produced so much zucchini. We could not keep up with all of it! We were picking about two zucchinis per day out of the garden that summer. For some reason, that was the only summer that we had such success with the zucchinis! Every night that summer, I tried to think of new ways to use the zucchini in recipes. One thing that I loved making was zucchini bread. One week, I had baked six loaves of zucchini bread with all the zucchini I was picking! That is when I came to the realization that I should be a little more adventurous and tried this recipe out. I like the zucchini cakes with melted fresh mozzarella cheese and a little Sriracha sauce for dipping. Greg recommends eating them with a gallon of ketchup. The zucchini cakes are a healthy enough meal and they are filling. Enjoy!

Recipe for Baked Zucchini Cakes

INGREDIENTS

  • 2 medium zucchini, grated with a box cutter
  • 1 cup fresh bread crumbs
  • 8 crushed saltine crackers for the mixture, plus about 16 more for coating the cakes
  • 2 cloves garlic, pressed
  • 1/2 tsp. of crushed red pepper flakes
  • 1/2 cup of grated Parmesan cheese
  • Salt and pepper
  • A dash or two of Sriracha sauce
  • 1 egg, beaten
  • 1/3 cup all-purpose flour
  • 3/4 tsp. baking powder

DIRECTIONS

Put the grated zucchini in a colander and carefully set it on top of a bowl so that the zucchini can drain. Add a little bit of coarse sea salt and gently mix. Let the grated zucchini drain for about an hour, tossing occasionally. About a cup of water from the zucchini should be in the bowl. After an hour, use your hands to squeeze out any excess moisture.

Preheat the oven to 450 degrees. Lightly oil a baking pan.

Put the bread crumbs, 8 crushed crackers, red pepper flakes, Parmesan cheese, salt, pepper Sriracha sauce, and beaten egg into a bowl and mix. Add in the grated zucchini and mix again. In a small bowl, sift together the flour and baking powder. Add the flour mixture to the zucchini mixture and mix well. Use your hands to form the mixture into 6 – 8 zucchini cakes. Try to make them the same size and thickness. Put the remaining crushed crackers onto a plate. Coat each side of the zucchini cakes with the crackers. Crush more crackers if needed for coating. Place the zucchini cakes on the baking pan. Put in the oven and cook for 10 – 15 minutes, then remove from oven and carefully turn over each one (use a spatula and make sure to keep them in tact). Place back in oven and cook for another 10 – 15 minutes. Sprinkle with salt and pepper and serve.

Serving suggestions: Serve with ketchup or another dipping sauce. Serve on a toasted and lightly buttered bun with fresh mozzarella cheese.

Original Recipe

The Mighty Zucchini -This thing was made in our garden.
Great in desserts, great in your dinner, great as a side vegetable!

Grilled Shrimp Fajitas (in a foil packet)

This is a seriously awesome meal! It is really easy to make (especially when I make Greg do the grilling), and it can be ready to be serve in less than 30 minutes from start to finish. I like to serve these shrimp fajitas with a side of black beans and some chopped mango. The shrimp, peppers, and onions cook on the grill in foil packets, so that the shrimp and veggies are sizzling hot and bursting with flavor.  Not only are these shrimp fajitas excellent, they also make a pretty healthy meal! This meal is best served piping hot, so it wouldn’t do so well leftover. For that reason, this recipe is only for two (Wendy won’t eat shrimp). You can double or triple the recipe if you are cooking for more than two. Enjoy!

Recipe for Grilled Shrimp Fajitas (cooked in a foil packet)

INGREDIENTS

1/2 pound of peeled and deveined medium shrimp (about 14 – 16 shrimp)
Red, orange, and yellow baby bell peppers, thinly sliced

1/2 yellow onion, thinly sliced
1 Tbsp. of extra-virgin olive oil
Juice of one lime
1 Tbsp. of your favorite taco seasoning
Cilantro (optional)
Sour cream (optional)
6-inch flour tortillas (about 4 – 5)

DIRECTIONS

Preheat a gas grill to high heat. 
Put the shrimp, chopped peppers, and onions into a medium bowl. Drizzle with the olive oil and lime juice and gently toss. Then sprinkle with the taco seasoning and gently mix until shrimp and veggies are well coated. 
Cut two pieces of foil into 12-inch squares. Put half the shrimp and veggie mixture down the center of each piece of foil. Then fold up each side of the foil and fold the sides over the shrimp completely. The foil packets are to be sealed (if needed, you can use another piece of foil to cover). Then place the foil packets on the grill and cook for 10 minutes. A minute before you take the shrimp off the grill, zap the tortillas in the microwave for 15 – 20 seconds so they are warmed before you assemble the fajitas.

Carefully remove the foil packets from grill. When you open them, be careful because the steam is super hot. Divide the shrimp and vegetable mixture onto the warmed tortillas (Greg and I do 3-4 shrimp per fajita) and top each with cilantro and sour cream, if desired.

Serve fajitas with some sides! We served them with black beans and some chopped fresh mango. 

Recipe makes approximately 4 – 5 fajitas. According to the original recipe, you can also cook the shrimp and vegetables in the foil packets in the oven at 400 degrees for 12 to 15 minutes.

Recipe Adapted from : Damn Delicious 

Weber Grill!

Turkey Burgers with Sundried Tomato

On nice spring and summer days in Maryland when we grill, we love burgers. I have made burgers out of vegetables, pork, chicken, beef, and turkey! We love these turkey burgers because they are full of yummy flavors and they are leaner than the traditional beef burger. These turkey burgers are always a favorite in our home, and they are pretty much the best turkey burgers that we have ever had. Serve them with chips or fries. Enjoy!

Recipe for Turkey Burgers with Sundried Tomato

INGREDIENTS

Mmm, turkey burger

1/2 pound of white ground turkey meat
1/2 pound of dark ground turkey meat
8 sun dried tomatoes packed in oil, sliced small
2 Tbsp. of the oil from the sun dried tomato jar
2 Tbsp. of fresh basil, torn in smallish pieces
2 Tbsp. of fresh Italian parsley leaves
1 clove of garlic, pressed
1 Tbsp. of Italian Panko-style breadcrumbs
Salt and Pepper
Fixings
Your favorite type of bun
Slices of fresh mozzarella cheese
Baby Spinach leaves
Sliced cherry tomatoes
Basil leaves
Garlic Mayo
4 Tbsp. of mayonnaise
1 Tbsp. of lemon juice
1/2 tsp. of garlic powder
Several grinds of freshly ground black pepper
A pinch of cayenne pepper (optional)

DIRECTIONS

Place the ground turkey, sun dried tomatoes, sun dried tomato oil, basil leaves, parsley leaves, pressed garlic, breadcrumbs, salt, and pepper into a large bowl. Use a spoon or fork to gently incorporate the ingredients together. Form into 4 even-sized patties. Place patties on a plate, make a small indent in the middle of each patty, cover and put in the fridge for 1 hour.
Before starting the grill, make the garlic mayo. Combine the ingredients in a small bowl and mix together well. Cover and set aside or put in fridge until ready for use.
Preheat a grill to 500 degrees. Place the patties on the grill and cook for about 5 – 7 minutes on each side. They should be firm and browned when they are ready to take off the grill.  Remove from grill, check center of thickest patty to make sure they are done (if not, put back on grill for a few minutes), and assemble burgers.
Spread the garlic mayo on each side of the bun. Place a turkey burger on the bottom half of the bun and top with a piece of mozzarella cheese. Top the cheese with a few baby spinach leaves, a piece of basil, and a few slices of cherry tomato.
Recipe makes 4 turkey burgers

Recipe Adapted from Whole Foods Market

Weber Grill!

%d bloggers like this: