Baked Zucchini Cakes

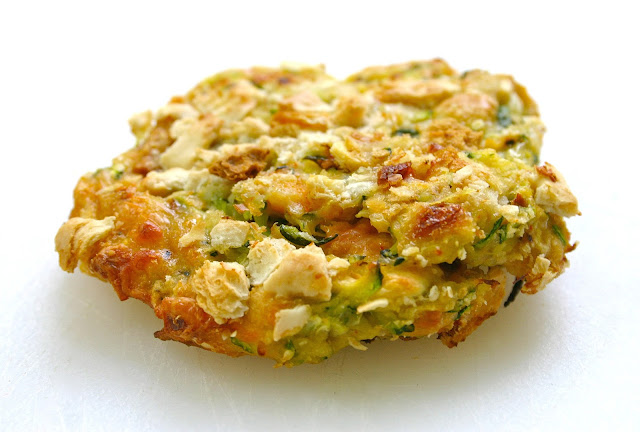
Greg absolutely loves these baked zucchini cakes. In fact, he was the one who told me that I should share this recipe on my previous blog and I know he wants to make sure it gets on this new blog, too. I am glad I had saved this recipe because it is a meal that we all enjoy. I had never really considered making something like these before, but when we used to have a garden, we would grow different vegetables. One year, our garden produced so much zucchini. We could not keep up with all of it! We were picking about two zucchinis per day out of the garden that summer. For some reason, that was the only summer that we had such success with the zucchinis! Every night that summer, I tried to think of new ways to use the zucchini in recipes. One thing that I loved making was zucchini bread. One week, I had baked six loaves of zucchini bread with all the zucchini I was picking! That is when I came to the realization that I should be a little more adventurous and tried this recipe out. I like the zucchini cakes with melted fresh mozzarella cheese and a little Sriracha sauce for dipping. Greg recommends eating them with a gallon of ketchup. The zucchini cakes are a healthy enough meal and they are filling. Enjoy!

Recipe for Baked Zucchini Cakes

INGREDIENTS

  • 2 medium zucchini, grated with a box cutter
  • 1 cup fresh bread crumbs
  • 8 crushed saltine crackers for the mixture, plus about 16 more for coating the cakes
  • 2 cloves garlic, pressed
  • 1/2 tsp. of crushed red pepper flakes
  • 1/2 cup of grated Parmesan cheese
  • Salt and pepper
  • A dash or two of Sriracha sauce
  • 1 egg, beaten
  • 1/3 cup all-purpose flour
  • 3/4 tsp. baking powder

DIRECTIONS

Put the grated zucchini in a colander and carefully set it on top of a bowl so that the zucchini can drain. Add a little bit of coarse sea salt and gently mix. Let the grated zucchini drain for about an hour, tossing occasionally. About a cup of water from the zucchini should be in the bowl. After an hour, use your hands to squeeze out any excess moisture.

Preheat the oven to 450 degrees. Lightly oil a baking pan.

Put the bread crumbs, 8 crushed crackers, red pepper flakes, Parmesan cheese, salt, pepper Sriracha sauce, and beaten egg into a bowl and mix. Add in the grated zucchini and mix again. In a small bowl, sift together the flour and baking powder. Add the flour mixture to the zucchini mixture and mix well. Use your hands to form the mixture into 6 – 8 zucchini cakes. Try to make them the same size and thickness. Put the remaining crushed crackers onto a plate. Coat each side of the zucchini cakes with the crackers. Crush more crackers if needed for coating. Place the zucchini cakes on the baking pan. Put in the oven and cook for 10 – 15 minutes, then remove from oven and carefully turn over each one (use a spatula and make sure to keep them in tact). Place back in oven and cook for another 10 – 15 minutes. Sprinkle with salt and pepper and serve.

Serving suggestions: Serve with ketchup or another dipping sauce. Serve on a toasted and lightly buttered bun with fresh mozzarella cheese.

Original Recipe

The Mighty Zucchini -This thing was made in our garden.
Great in desserts, great in your dinner, great as a side vegetable!

Grilled Shrimp Fajitas (in a foil packet)

This is a seriously awesome meal! It is really easy to make (especially when I make Greg do the grilling), and it can be ready to be serve in less than 30 minutes from start to finish. I like to serve these shrimp fajitas with a side of black beans and some chopped mango. The shrimp, peppers, and onions cook on the grill in foil packets, so that the shrimp and veggies are sizzling hot and bursting with flavor.  Not only are these shrimp fajitas excellent, they also make a pretty healthy meal! This meal is best served piping hot, so it wouldn’t do so well leftover. For that reason, this recipe is only for two (Wendy won’t eat shrimp). You can double or triple the recipe if you are cooking for more than two. Enjoy!

Recipe for Grilled Shrimp Fajitas (cooked in a foil packet)

INGREDIENTS

1/2 pound of peeled and deveined medium shrimp (about 14 – 16 shrimp)
Red, orange, and yellow baby bell peppers, thinly sliced

1/2 yellow onion, thinly sliced
1 Tbsp. of extra-virgin olive oil
Juice of one lime
1 Tbsp. of your favorite taco seasoning
Cilantro (optional)
Sour cream (optional)
6-inch flour tortillas (about 4 – 5)

DIRECTIONS

Preheat a gas grill to high heat. 
Put the shrimp, chopped peppers, and onions into a medium bowl. Drizzle with the olive oil and lime juice and gently toss. Then sprinkle with the taco seasoning and gently mix until shrimp and veggies are well coated. 
Cut two pieces of foil into 12-inch squares. Put half the shrimp and veggie mixture down the center of each piece of foil. Then fold up each side of the foil and fold the sides over the shrimp completely. The foil packets are to be sealed (if needed, you can use another piece of foil to cover). Then place the foil packets on the grill and cook for 10 minutes. A minute before you take the shrimp off the grill, zap the tortillas in the microwave for 15 – 20 seconds so they are warmed before you assemble the fajitas.

Carefully remove the foil packets from grill. When you open them, be careful because the steam is super hot. Divide the shrimp and vegetable mixture onto the warmed tortillas (Greg and I do 3-4 shrimp per fajita) and top each with cilantro and sour cream, if desired.

Serve fajitas with some sides! We served them with black beans and some chopped fresh mango. 

Recipe makes approximately 4 – 5 fajitas. According to the original recipe, you can also cook the shrimp and vegetables in the foil packets in the oven at 400 degrees for 12 to 15 minutes.

Recipe Adapted from : Damn Delicious 

Weber Grill!

Turkey Burgers with Sundried Tomato

On nice spring and summer days in Maryland when we grill, we love burgers. I have made burgers out of vegetables, pork, chicken, beef, and turkey! We love these turkey burgers because they are full of yummy flavors and they are leaner than the traditional beef burger. These turkey burgers are always a favorite in our home, and they are pretty much the best turkey burgers that we have ever had. Serve them with chips or fries. Enjoy!

Recipe for Turkey Burgers with Sundried Tomato

INGREDIENTS

Mmm, turkey burger

1/2 pound of white ground turkey meat
1/2 pound of dark ground turkey meat
8 sun dried tomatoes packed in oil, sliced small
2 Tbsp. of the oil from the sun dried tomato jar
2 Tbsp. of fresh basil, torn in smallish pieces
2 Tbsp. of fresh Italian parsley leaves
1 clove of garlic, pressed
1 Tbsp. of Italian Panko-style breadcrumbs
Salt and Pepper
Fixings
Your favorite type of bun
Slices of fresh mozzarella cheese
Baby Spinach leaves
Sliced cherry tomatoes
Basil leaves
Garlic Mayo
4 Tbsp. of mayonnaise
1 Tbsp. of lemon juice
1/2 tsp. of garlic powder
Several grinds of freshly ground black pepper
A pinch of cayenne pepper (optional)

DIRECTIONS

Place the ground turkey, sun dried tomatoes, sun dried tomato oil, basil leaves, parsley leaves, pressed garlic, breadcrumbs, salt, and pepper into a large bowl. Use a spoon or fork to gently incorporate the ingredients together. Form into 4 even-sized patties. Place patties on a plate, make a small indent in the middle of each patty, cover and put in the fridge for 1 hour.
Before starting the grill, make the garlic mayo. Combine the ingredients in a small bowl and mix together well. Cover and set aside or put in fridge until ready for use.
Preheat a grill to 500 degrees. Place the patties on the grill and cook for about 5 – 7 minutes on each side. They should be firm and browned when they are ready to take off the grill.  Remove from grill, check center of thickest patty to make sure they are done (if not, put back on grill for a few minutes), and assemble burgers.
Spread the garlic mayo on each side of the bun. Place a turkey burger on the bottom half of the bun and top with a piece of mozzarella cheese. Top the cheese with a few baby spinach leaves, a piece of basil, and a few slices of cherry tomato.
Recipe makes 4 turkey burgers

Recipe Adapted from Whole Foods Market

Weber Grill!

Creamy Cajun Style Pasta with Andouille Sausage

f you are looking for a way to jazz up your pasta, this is the recipe for you! I made this recipe back in the day, and when going through all my previous recipes realized that I need to make it again very soon. If you are looking for something healthy, this recipe is probably (definitely) not what you are looking for. The sauce is loaded with cream and butter – which makes it extra delicious. But, if the fat taste good, then they are good fats…right?

This creamy Cajun-style pasta is fairly quick and easy to make. It is nice and filling, and it is definitely a comfort food. Enjoy!

Recipe for Creamy Cajun Style Pasta with Andouille Sausage

INGREDIENTS

7 ounce link of Andouille sausage, sliced into smallish pieces (I use precooked sausage)
8 ounces of Farfalle pasta (bowtie)
1 Tbsp. of unsalted butter
1 Tbsp. of extra-virgin olive oil
1/3 cup of sweet yellow onion, chopped
1 yellow bell pepper, chopped
1 red bell pepper, chopped
1/2 tsp. of kosher salt
1/4 tsp. of garlic powder
3/4 tsp. of Cajun seasoning
1/4 tsp. of cayenne pepper
Several grinds of freshly ground black pepper
1/2 cup of 2% milk
1 cup of heavy cream
1 Tbsp. of cornstarch
1 Tbsp. of water

DIRECTIONS
Cook the sausage according to package directions, or until fully cooked, in a large skillet. Transfer sausage to a plate and set aside.

Bring a large pot of water to a boil and cook pasta according to package directions.

In a small bowl, mix together the water and cornstarch. You will use this for the sauce. Set aside.

While pasta is cooking, put the butter and olive oil into the skillet you used to cook the sausage. Set over medium heat. When the butter melts, add the chopped peppers and onions to the skillet. Add in the salt, garlic powder, Cajun seasoning, cayenne pepper, and black pepper. Cook for about 6 – 8 minutes, stirring frequently. Then add in the milk and cream and bring to a simmer. Once it simmers, give the cornstarch and water mixture a stir and then add it to the sauce. Cook until the sauce has thickened, about 5 minutes or so.

Once pasta is finished cooking, drain in a colander. Add the cooked pasta to the thickened sauce and add in the cooked sausage. Stir well to coat in the sauce. Adjust heat to medium-low and cook until the sausage is warmed through. Serve immediately.

Makes 4 generous-sized servings. Good for leftovers. 

Recipe Adapted from: Annie’s Eats 

OXO Colander in Sea Glass. I want one.

5-Ingredient Pumpkin Black Bean Soup

This soup is super awesome because you make barely any mess making it, the prep time is less than 1 minute, and the cooking time is just a little over 5 minutes. Oh, and it also is pretty darn tasty AND healthy. It’s loaded with Vitamin A, protein, and fiber. You can make it with more kick based on the type of salsa you use in the recipe. The first few times I made it I used a Hatch Chile salsa, and it was nice and spicy. Now when I make this soup, I like to use a milder salsa to make everyone in the family happy. You can serve this soup with quesadillas or serve it on its own with some tortilla chips. I love warming the tortilla chips in the oven with a little olive oil and salt to serve with chili type recipes. This soup is rich and creamy, and is definitely a comfort-type food, but it has the bonus of being good for you. Enjoy!

Recipe for 5-Ingredient Pumpkin Black Bean Soup

INGREDIENTS

1 can of black beans (15.5 ounces), drained and rinsed
1/2 cup of water, vegetable broth, or chicken broth
1/3 cup of canned pumpkin puree
1/3 cup of salsa (we like it with Newman’s own Farmer’s Garden – you can use hot or mild salsa)
1/2 tsp. of cumin powder
Salt and pepper, to taste
1/3 cup of full-fat Greek yogurt or sour cream

DIRECTIONS

Dump the black beans, water, pumpkin puree, and salsa into a medium sized pot. Sprinkle in the cumin powder, salt, and pepper. Use a spoon to mix well. Set the pot over medium heat on the stove top and cook for 4 – 5 minutes, or until hot. Then adjust the heat to low and stir in the Greek yogurt until smooth. Cook for an additional 45 seconds to 1 minute (don’t cook too long, because the yogurt will curdle a bit and slightly effects the texture of soup). Remove from heat and ladle into bowls. Sprinkle with white cheddar cheese, if desired.

Makes approximately 2 – 3 servings. 
Original Recipe

Per Serving (with a serving being 1/3 of the recipe): 155 calories, 2 grams fat, 29 grams carbohydrates, 12 grams protein, 8 grams fiber, 50% RDA Vitamin A, 15% RDA Iron,

A great saucepan for making this soup! 

Best Coconut Macaroons Ever with Chocolate & Almonds

These macaroons are a new and improved version of the coconut macaroons I love to make. This recipe adds in almonds and dark chocolate to the mix – yum! Many friends have mentioned to me how much they like the macaroons and the coconut truffles so I thought combining the two recipes would be a great idea. And it was. Enjoy!

Recipe for Best Coconut Macaroons Ever with Chocolate & Almonds

INGREDIENTS

1 14-oz bag of sweetened shredded flaked coconut
1 14-oz can of sweetened condensed milk

2 Tbsp. of all-purpose flour
2 tsp. of vanilla extract
1 1/2 tsp. of almond extract
1 cup of finely chopped almonds
8 oz of semisweet baking chocolate squares, broken in half

DIRECTIONS

Combine the coconut, condensed milk, flour, vanilla extract, almond extract, and finely chopped almonds in a large mixing bowl. Mix until it is well blended. Cover the bowl and put it into the fridge for at least 3 hours.

Preheat the oven to 330 degrees. Line baking sheets with parchment paper.

Use a cookie dough scoop to scoop up the mixture. Use your hands to form into 1 1/2 inch balls and place on the baking sheet, leaving an inch of space between each. Place in oven and cook for 20 – 23 minutes, or until tops are golden. Remove pan from oven and allow to cool completely.

Once macaroons have completely cooled, place the chocolate into a small saucepan and set it over low heat. Stir constantly until the chocolate melts. Turn off the heat. Use a fork to drip chocolate over the cooled macaroons (using as much or as little chocolate as you like). Place macaroons in the fridge until the chocolate hardens, then remove from fridge and store in an airtight container.

*Recipe makes about 30 coconut macaroons*

The cookie dough scoop makes shaping so much easier!

Dark Chocolate Red Wine Truffles with Sea Salt or Sugar

If you know me, you know that I love truffles. Not only do I love to eat truffles, I also really enjoy making them. This truffle recipe is a lot of fun and it combines a lot of things that many people crave – chocolate, red wine, and salt. The first time I made these, I used coarse decorative sugar on the top. When I shared that batch with some of my old coworkers they first thought it was sea salt and when they found out it wasn’t, they asked me if they could pretend it was sea salt. But why pretend when you can have the real deal? Adding sea salt to them was a great idea. Now when I made these truffles I make some with sea salt, some with sugar, and some with both the sea salt and the sugar. Each one is delicious. The flavor of the red wine is very subtle, and the chocolate is perfectly rich and creamy. The crunch from the salt and/or sugar is a fun touch. So, if you are craving sweet, salty, sinful, rich, and indulgent, try these truffles! Enjoy.

Recipe for Dark Chocolate Red Wine Truffles with Sea Salt or Sugar

INGREDIENTS

  • For the filling
  • 8 ounces of heavy whipping cream
  • 8 ounces of finely chopped semisweet chocolate
  • 2 – 3 Tbsp. of red wine (cabernet sauvignon)
  • For dipping and topping
  • 8 ounces of semisweet chocolate
  • Coarse sea salt and/or decorative sugar

DIRECTIONS

For the filling
To finely chop the chocolate, break it up and put it in the bowl of a food processor. Pulse until it is very finely chopped.

Put the cream in a saucepan and set over medium low heat. Bring it to a simmer, watching constantly. Once it simmers, immediately remove from heat. Pour in the 8 ounces of finely chopped chocolate, cover the pan, and let rest for 5 minutes. After 5 minutes, remove the lid and use a spoon to slowly and gently stir until cream and chocolate are fully combined. Stir in the wine and again gently stir until well combined. Transfer the mixture to a bowl, cover, and put in fridge for several hours (preferably overnight).

After filling has chilled, you are ready to roll into balls. Line a freezer safe container with parchment paper or foil. Use a 1-inch cookie dough scoop to scoop up the filling and use your hands to roll into balls (I usually dust my hands with cocoa powder several times and have paper towels close by during this step – it gets messy). Once you have used all the filling, cover the balls with foil or a lid and put into the freezer. Allow to rest in the freezer for at least 4 hours, preferably longer.
For dipping
Line a baking sheet with parchment paper. Place the decorative sugar on a small plate and the sea salt on another small plate, and have a small spoon to use for each.

Coarsely chop or break the remaining 8 ounces of semisweet chocolate and place it into a medium sized saucepan. Prepare a double boiler and place the double boiler over medium heat. Place the saucepan with chocolate on top of the double boiler. Stir frequently, until chocolate is smooth and completely melted. Take the balls out of the freezer and turn the heat off.

Drop 1 or 2 balls into the melted chocolate and use a spoon to fully coat each one with the chocolate. Use the spoon to drop the coated truffles onto the baking sheet. Sprinkle the salt and/or sugar onto the tops of the truffles while the chocolate is still wet. Repeat with the remaining truffles. Put the baking sheet with the truffles in the fridge and allow them to harden before eating.

Recipe makes approximately 20 – 25 truffles.

NOTE: One thing I have noticed about dipping these truffles is that the dipping chocolate can get messy quickly. If you have the time, it helps to dip the truffles in two parts. Leave half of the truffles in the freezer, melt only 4 ounces of the chocolate and dip only half the truffles. Then melt the remaining 4 ounces and dip the last half of the truffles.

Inspired by: The Curvy Carrot & Truffles by Dede Wilson 

You know you want me!

Cafe Rio Style Slow Cooker Mexican Shredded Chicken

Here is one of my favorite recipes that I make over and over again. It is so easy to make thanks to the slow cooker! For those of you who don’t know about Cafe Rio, you should really check it out! It used to be just a west coast thing but now it’s a bit of an east coast thing too. This chicken really is similar to the chicken you’d get a Cafe Rio (now I just need to figure out their barbacoa recipe)! The shredded chicken can be used for tacos, salads, burritos, and loaded nachos. We all love it so much in our house, and I am pretty sure you and your entire family will also love the chicken. You will love how easy it is to make and how good it tastes! Enjoy.

Recipe for Cafe Rio Style Slow Cooker Mexican Shredded Chicken

INGREDIENTS

2 1/4 pounds of boneless skinless chicken breasts
3/4 cup of Italian salad dressing
1 packet of Ranch dressing
1/2 cup of water
2 tsp. of chili powder
1 1/2 tsp. of cumin
3/4 tsp. of coriander
1 Tbsp. of prepared (jarred) minced garlic (or 6 cloves of pressed fresh garlic OR 2 tsp. of garlic powder)
1 Tbsp. of dried onion flakes

DIRECTIONS

Put all of the ingredients into the slow cooker. Turn heat on low and cook for five to six hours or until chicken shreds well with a fork. Then shred up the chicken and you are done!

Serving suggestions:
For a taco salad – Put chopped iceberg lettuce on a plate. Add black beans, corn, shredded chicken, torn cilantro leaves, grated cheese, chopped avocado, chopped tomatoes, and sour cream (or Greek yogurt). Drizzle with some lime juice and your favorite salsa.

Burritos/tacos – Use same ingredients as the salad but put in a taco shell or warmed tortilla!

Recipe Adapted from: Our Best Bites

 Recipe makes approximately 10 – 12 servings.

Steak Remix: Philly Cheesesteak Sandwich (by Greg)

Occasionally Beth and I like to eat steak….but it is so expensive. Traditionally I have gone for the Filet Mignon/Beef Tenderloin, but of course that is the priciest cut. Recently I have been buying Top Sirloin instead and have been pretty satisfied with the quality and also like that it is less than half the price. To get my best deal on meat, I’ve been going to Sam’s Club, which is great if you are throwing a dinner party, but usually way too much food for a couple or even a small family like us. So, last night after grilling up the steak for the three of us, I certainly had a bit of the 3.5 pound package of meat left over. So now we are challenged to use the leftovers, which prompted me to make Philly Cheesesteak Sandwiches today. Despite the fact that I didn’t have any sub rolls, the sandwiches were super yummy and easy to make. Here’s how….
I started by peeling and slicing a small yellow onion lengthwise into 1/8th inch strips. In a medium-sized frying pan I coated the bottom with olive oil and added three slices of butter and turned the burner to medium and waited until the butter melted into the olive oil, stirring it in a bit with a silicone spatula, and then adding the onions after the butter was evenly melted. I continued to cook the onions and stir occasionally until the onions turned golden-brown and then removed them from the pan and placed them aside in a bowl.
Then in the same warm pan I added the already grilled, but still rare steak, cut into very thin slices and also into strips about 1/4 inch thick in width. I kept the frying pan on medium until the steak was warm, and then I added 5 pieces of provolone on top of the meat and covered the pan in order to melt the cheese. I stirred occasionally until all the cheese was melted and evenly spread through the meat. There was a bit of excess moisture in the pan, so I drained most of it. Next I re-added the onion into the pan with the meat and cheese and gave it a final stir. 
I toasted the bread to a golden brown and then made sandwiches with the marvelous mixture. All-in-all it only took me about 20 minutes to make a sweet lunch treat for three…a great way to use the leftover meat. Beth may make some Steak Chili later because we still have plenty more Top Sirloin in the fridge. Other options for us include steak fajitas or burritos.  

INGREDIENTS NEEDED: Cooked steak, onions, butter, olive oil, provolone cheese, bread

Crispy Honey & Sriracha Tofu Tacos

Tacos are the best! You can make them in so many different ways so that you are able to please everyone. These vegetarian crispy honey sriracha tofu tacos with a cucumber mango salsa are so amazingly delicious and satisfying!

My sister and her family live in a suburb of San Francisco, but they used to live in the city. When we would visit them in the city, we would enjoy lunch at their favorite place, La Taqueria, in the Mission District of the city. That is where I learned about how much variety there are in tacos, as I had grown up on the ground beef, cheddar cheese, lettuce, and tomato taco!

These delicious tacos are topped with cucumber-mango salsa, mashed avocado, and extra Sriracha sauce.  When I first tried the recipe, I really was a little skeptical about tofu in my tacos, and I was truly amazed at how well they turned out. Even if you are not a vegetarian, I am pretty sure you will find these tacos to be quite tasty. Enjoy!

Recipe for Crispy Honey & Sriracha Tofu Tacos

INGREDIENTS

For the Cucumber-Mango Salsa
1 large, ripe mango, cut into 1/4-inch chunks
1/2 English cucumber, peeled and with the seeds removed, finely chopped
1/2 shallot, minced
1/2 jalapeno pepper, minced (with seeds removed)
Juice from 1/2 lime (save the other half for the avocado)
1/2 tsp. honey
Salt and pepper

For the tofu
12 ounces extra firm tofu, drained well, patted with a paper towel, and cut into 3/4-inch chunks
2 Tbsp. Sriracha sauce (plus a little more for adding to taco)
2 Tbsp. honey (plus a little more for drizzling)
1/2 cup + 1 Tbsp. of cornmeal
1/3 cup Panko breadcrumbs
2 Tbsp. all-purpose flour
1/4 tsp. salt
Freshly ground black pepper – about 1/8 tsp.
3/4 tsp. Ancho chile powder
1/8 tsp. of sweet smoked paprika
3 Tbsp. olive oil

Soft taco corn tortillas, Avocado, Full Fat Greek Yogurt (or sour cream)

DIRECTIONS

Prepare the cucumber mango salsa. Toss the cucumber, mango, jalapeno, shallot, lime juice, honey, salt and pepper into a bowl and mix well. Cover and place in fridge until ready to use.

Preheat the oven to 315 degrees. Place tortillas on a baking sheet. Rub a very small amount of olive oil all over each side and sprinkle one side with a pinch of fine sea salt. Set aside.

Put the tofu in a large bowl. Mix together the honey and Sriracha sauce in a small bowl. Pour over the tofu, and gently toss to coat well.

In another bowl, mix together the cornmeal, Panko breadcrumbs, flour, salt, pepper, chili powder, and sweet smoked paprika. Then pour 1/3 of the cornmeal mixture over the tofu, and toss gently. Add another 1/3 of the mixture, toss again. Finish with the remaining mixture and toss again to coat the tofu well. Set aside.

Heat the olive oil over medium high heat until hot. Then carefully add in the tofu. Cook, undisturbed, for a few minutes, then gently stir and flip over, a few at a time, until all pieces have been flipped. Cook for 3 – 4 minutes more, then gently stir again. Continue to cook and gently toss until tofu is crisped up on all sides. Add in a drizzle or two of honey, and stir. Turn off the heat. Sprinkle the tofu with salt and pepper.

While the tofu is cooking, place the tortillas in the heated oven. Cook for a few minutes, then flip. You want the tortillas to be a little crispy, but not hard. You want a very light crisp so that they still fold well without breaking. That is why it is important to buy good tortillas!

While the tofu and tortillas are finishing up, mash up the avocado. Squeeze lime juice over the avocado, then sprinkle with salt and pepper.

Assemble the tacos. Top each warm tortilla with desired amount of tofu, cucumber-mango salsa, avocado, and Greek yogurt. Add a squeeze of Sriracha sauce, if desired.

Recipe makes approximately 6  – 8 tacos. 

Tofu taco recipe adapted from: The Woks of Life
Cucumber-Mango salsa adapted from:  Oh My Veggies